Welcome to Repchitect
Repchitect is your coaching command center. You build programs, review your clients' workouts, message them with video, schedule sessions, and track their progress, all from one app that works on your phone and your desktop.
The one idea that makes everything click
Your clients never log in. There are no client passwords to manage. When you add a client, Repchitect creates a private link just for them. They tap it and they're in: their program, their chat with you, their progress. You'll share that link once (by text or email), and that's their whole sign-in.
Everything you do for a client lives on their profile. Open a client and you get a tidy hub of cards (Messages, Schedule, Program, Progress, Check-ins, Details), and you drill into whichever one you need. You never hunt through menus; you go to the client, then to the thing.
What you can do
👥 Manage clients
Add clients, share their private portal link, track status and streaks, pause or resume access.
🏗️ Build programs
Create routines from a 5,600-move library with demo videos, or add your own custom exercises.
💬 Coach with video
Message clients, review their logged workouts, and reply with a form-check clip.
🗓️ Schedule & sell
Book sessions on a calendar, track PT packages, and log in-person sessions.
🎨 Brand it yours
Pick a look, your color, typeface and header photo. Your clients see your brand everywhere.
📊 See the picture
Roster numbers, package health, check-ins, measurements, and personal records.
Signing in & installing
You sign in with an email and password. Adding the app to your home screen gives you a full-screen, offline-capable app that's ready the moment you're on the gym floor.
Sign in
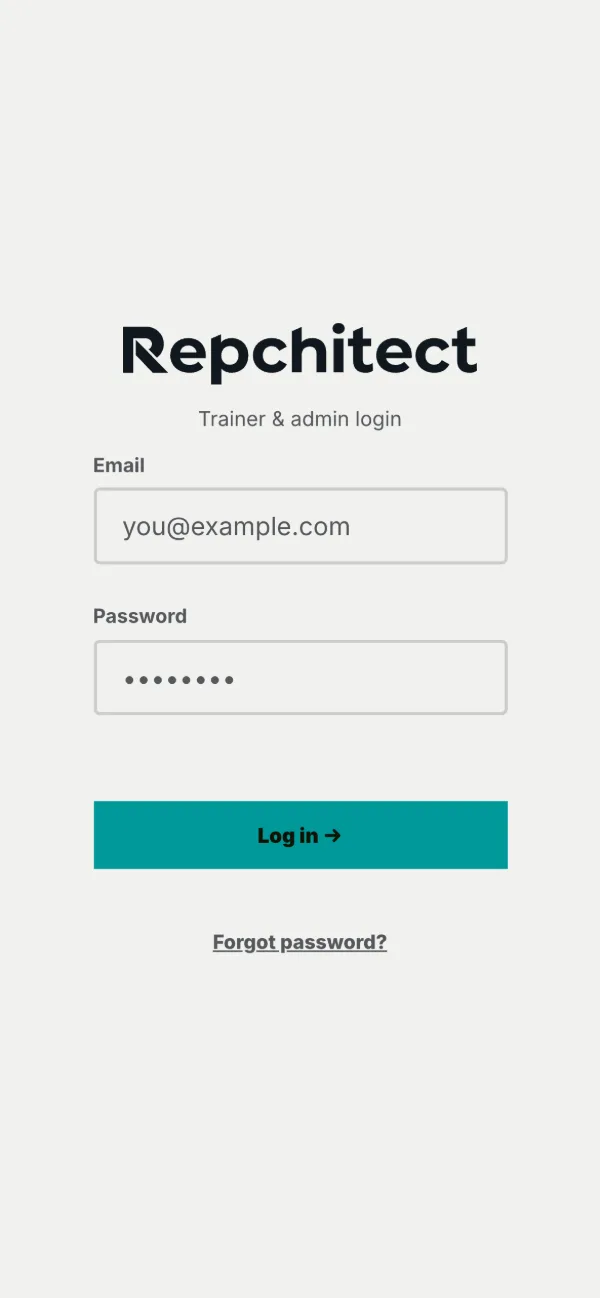
- Open your Repchitect web address. You'll land on the login screen.
- Enter your Email and Password.
- Tap Log in →. (The button reads "Logging in…" while it works, then your dashboard opens.)
If you ever see an Account Suspended screen, your access has been paused by the platform administrator. Reach out to them.
Add to your home screen
This turns Repchitect into a real app icon that launches full-screen and keeps working if your gym's Wi-Fi is spotty.
iPhone (Safari)
- Open your link in Safari and wait for the dashboard to load.
- Tap Share (the square with an arrow), then Add to Home Screen.
- Tap Add. Launch it from the new icon any time.
Android (Chrome)
- Open your link in Chrome and let it load.
- Tap the ⋮ menu, then Add to Home screen (or Install app).
- Confirm, and the icon appears in your app drawer.
Your dashboard & the Today hub
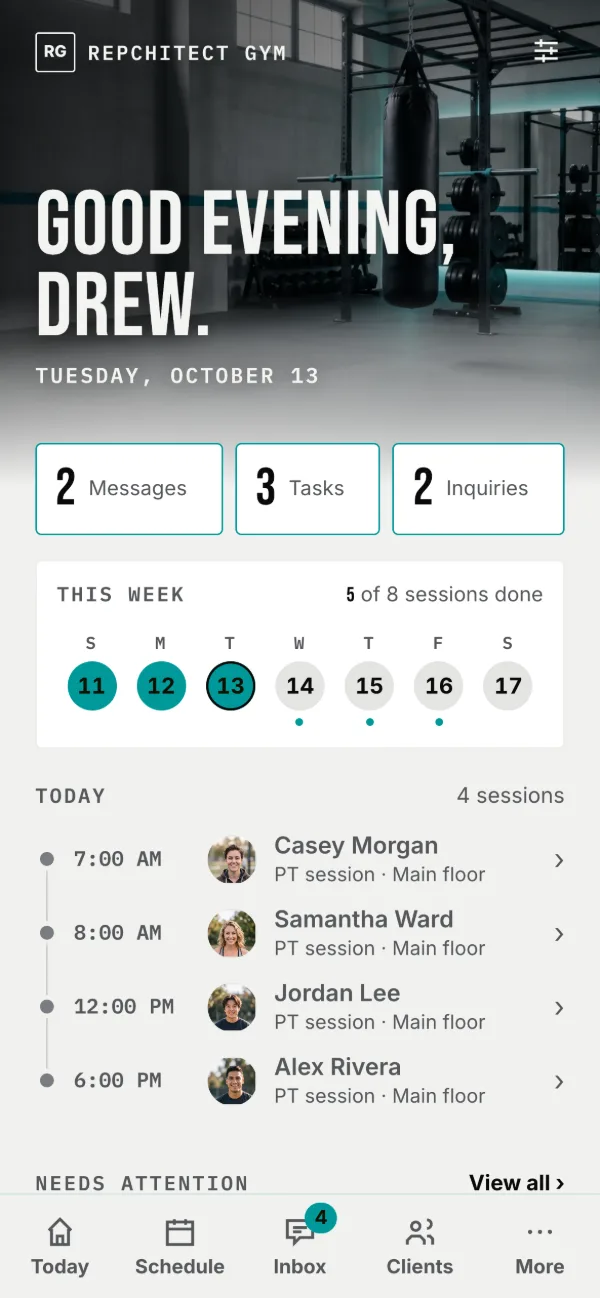
Five icons along the bottom take you everywhere. The Today screen is your morning briefing: what's booked, who needs a reply, who's running low, and what's waiting to be reviewed.
The bottom navigation
These five icons are pinned to every screen. Tapping any one also snaps you back out of a client profile or the builder.
| Icon | Takes you to |
|---|---|
| Today | Your day-at-a-glance hub |
| Schedule | The full calendar of all clients |
| Inbox | Messages, workouts to review, and inquiries |
| Clients | Your roster, with its key numbers at the top |
| Builder | Programs: reusable templates and each client's live program |
The Today screen, in order
- Your brand over your header photo, with the gear for Settings at the top right.
- A greeting, with today's date under it.
- Three cards: Messages · Tasks · Inquiries. A dot on a card means something inside is waiting; each opens the screen that clears it.
- Next session: the next one still ahead, with a countdown. Tap it to open Session notes for that client (see Coaching a session).
- The day as a timeline: every appointment with its time, client and place, in your chosen 12/24-hour format. Tap one to open it.
- Needs attention: the clients who need you, each with the reasons (not training, check-in overdue, plan running out, sessions low). View all opens the full list.
There is no top bar any more: Settings is the gear on Today and a row in More, and gym owners open Gym admin from More. Logging out lives at the bottom of Settings. Until your account is set up, Today also offers a short checklist. Each row is a shortcut to the screen that completes it, and it disappears for good once everything is done.
Clients & your roster
Your roster is the list of everyone you coach. From here you add people, open their profiles, and share the private link that is their entire sign-in.
Reading the roster
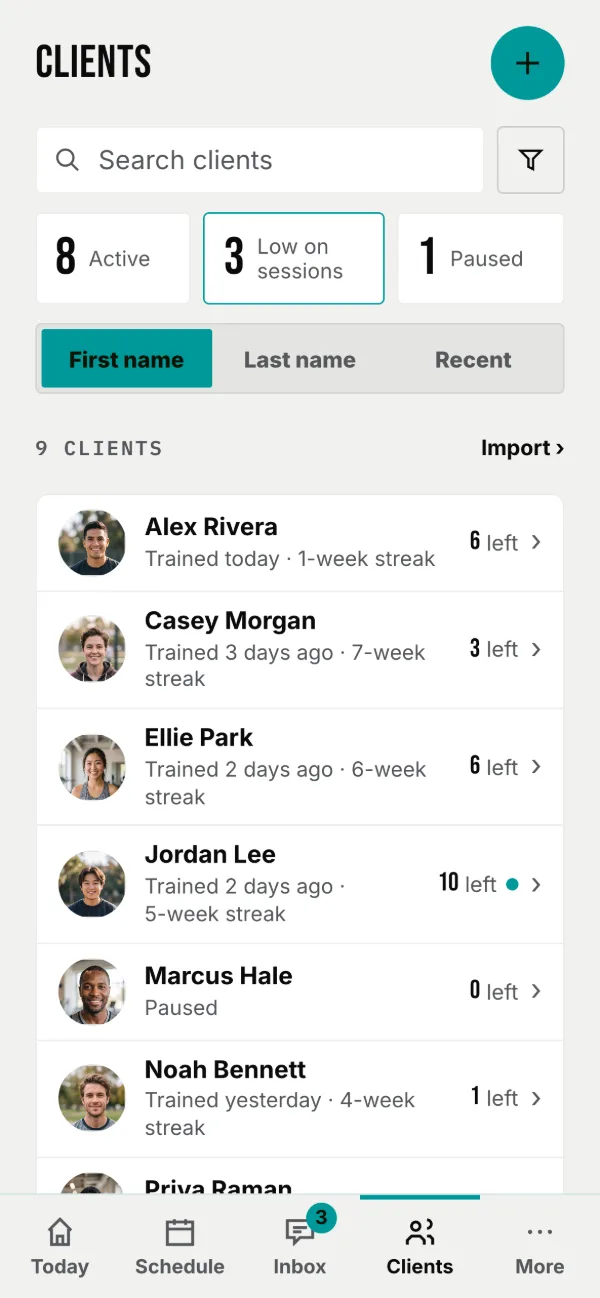
At the top, three tiles count your Active clients, those Low on sessions, and those Paused; tap one to show only those clients. Search by name, sort by first name, last name or most recent, and Import sits beside the count.
Each row shows the client's header photo (or their initials), their name, when they last trained and their streak, the sessions left on their package, and a dot when they have written to you.
Add a new client
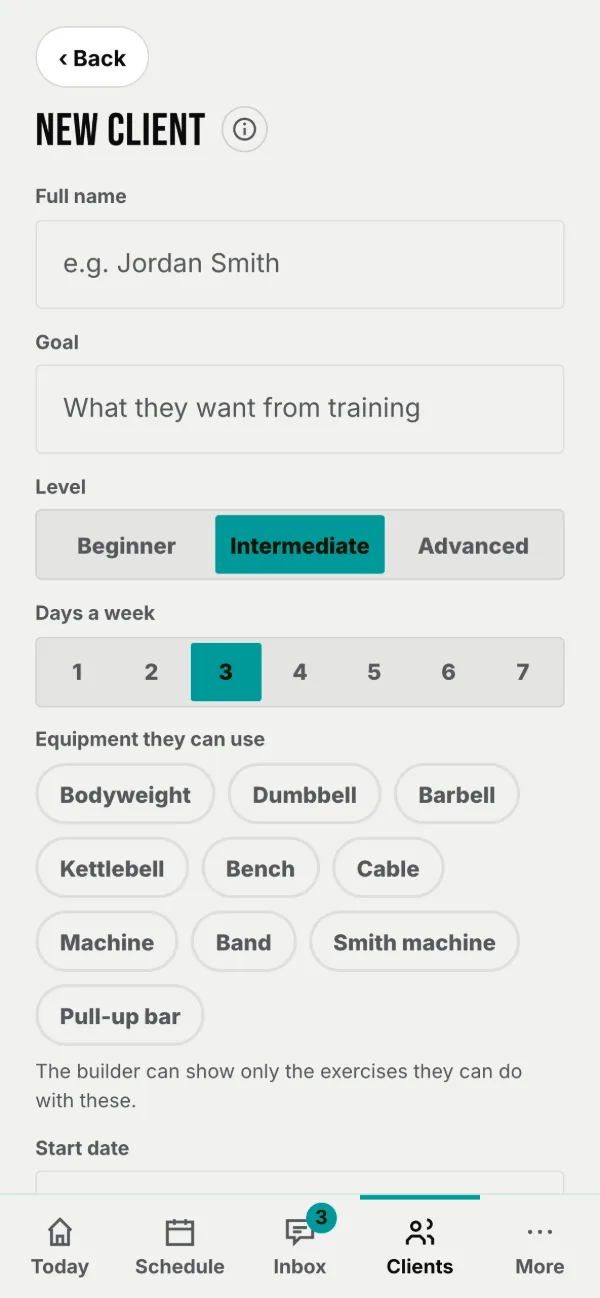
- Tap + New Client at the bottom of the roster.
- Fill in their Full name and their Goal in their own words.
- Tap their Level and how many Days a week they train (1 to 7).
- Under Equipment they can use, tick everything they have. The exercise picker can then show only what they can do.
- Set the Start date and add any Notes for you, such as injuries or their schedule. These are private to you.
- Tap Create client. They appear on your roster.
The private portal link
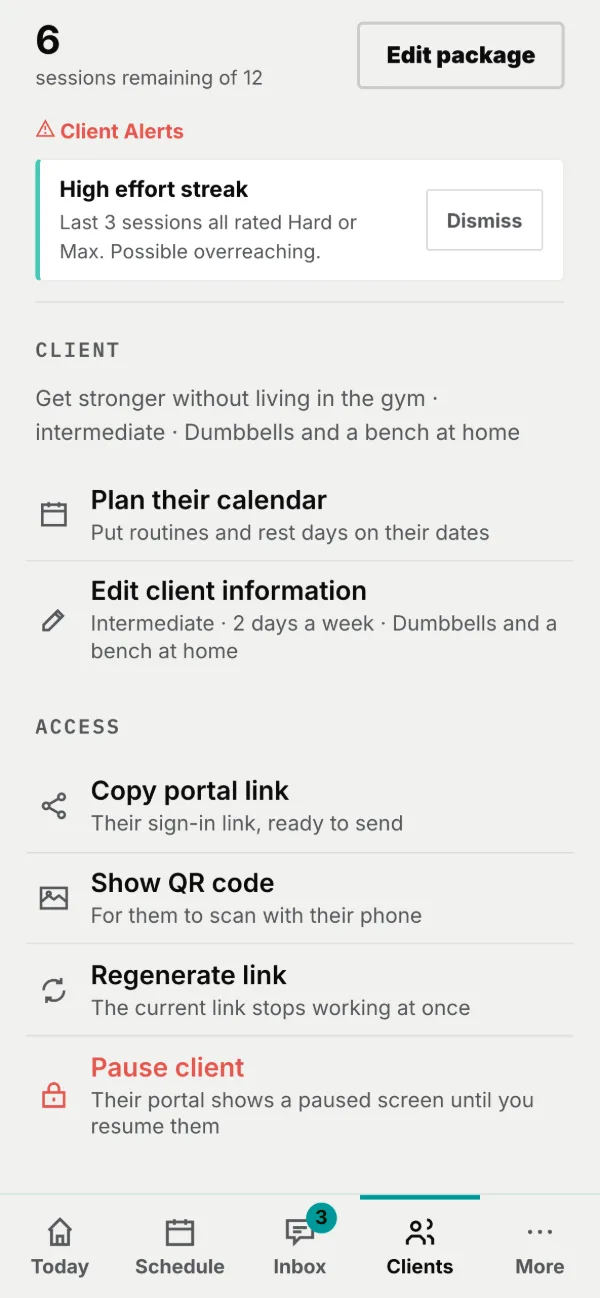
This is how a client gets in, with no login and no password. Repchitect makes a unique link for each client; whoever opens it is that client.
- Open the client → tap the Details card.
- Under Access, tap Copy portal link.
- Send it by text or email. That link is their whole sign-in.
From Details you can also Edit client information, or Pause client to freeze their portal while keeping all their data (tap again to resume).
The client profile
Everything you do for one person lives here: their header photo and name, one big action, and four tabs.
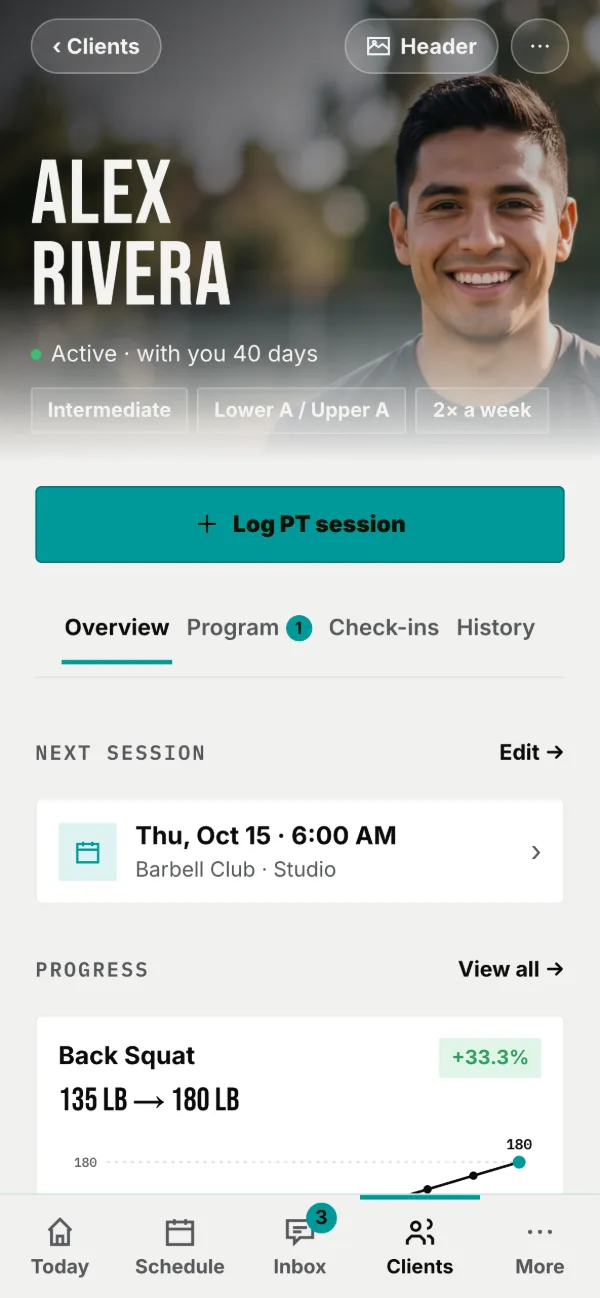
Header & primary action
The header shows the client's photo behind their name, how long they've trained with you, their pronouns if they gave them, and three pills (level, routines, days a week). Header changes the photo; the ⋯ holds Messages, Schedule, Details, Nutrition plan and Habits. Below sits the action you reach for most: + Log PT session.
The four tabs
| Tab | What's inside | Covered in |
|---|---|---|
| Overview | Their next session, their most-logged lift as a chart, workouts in 30 days, adherence and volume. Progress · View all opens their full progress. | Progress & records |
| Program | Their routines, this week, workouts to review, and the equipment they can use | Build a program · Reviewing |
| Check-ins | Their latest answers, check-in settings, forms, nutrition plan and habits | Check-ins & nutrition |
| History | Recent records and workouts, then everything they have logged | Progress & records |
From the ⋯: Messages (full-screen chat and video feedback), Schedule (this client's calendar), Details (package, alerts, client information and the portal link), Nutrition plan and Habits.
Build a program
A program is a set of routines, one per training day. You build them in the builder: name each routine, add exercises, set the numbers, and save.
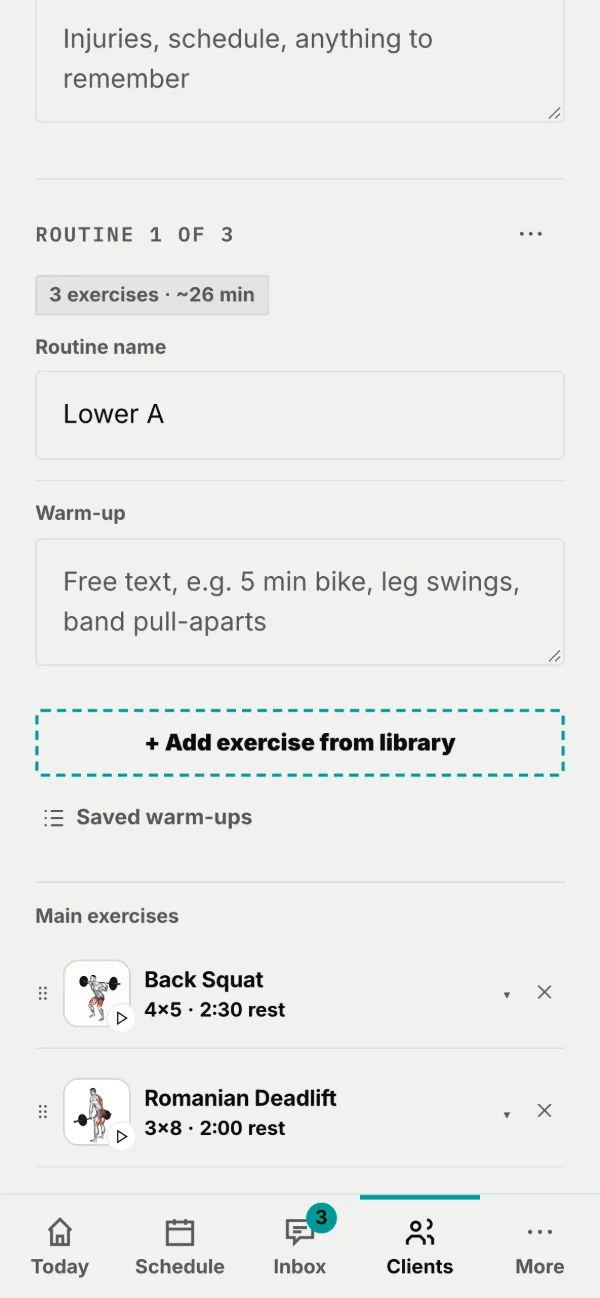
Open the builder & build
Programs belong to a client, so start from their profile. Open the Program tab and tap + Add routine to open the builder with a fresh routine. Each routine is one day: a name, a Warm-Up, the Main Exercises, and a Cool-Down.
- Give the routine a Routine Name (e.g. "Push A: Chest & Shoulders").
- Under Main Exercises, tap + Add Exercise and pick from the library.
- Set each exercise's sets, reps, rest, target weight, and any coach note.
- Add another day with + Add Routine, or pull one in with + Add Routine from Template.
- Reorder exercises by dragging the ⠿ handle.
- Tap Save at the bottom.
Exercises & the library
The picker searches a library of roughly 5,600 movements (most with demo videos), plus any custom exercises you've made. Add one, then dial in the sets, reps, and rest.
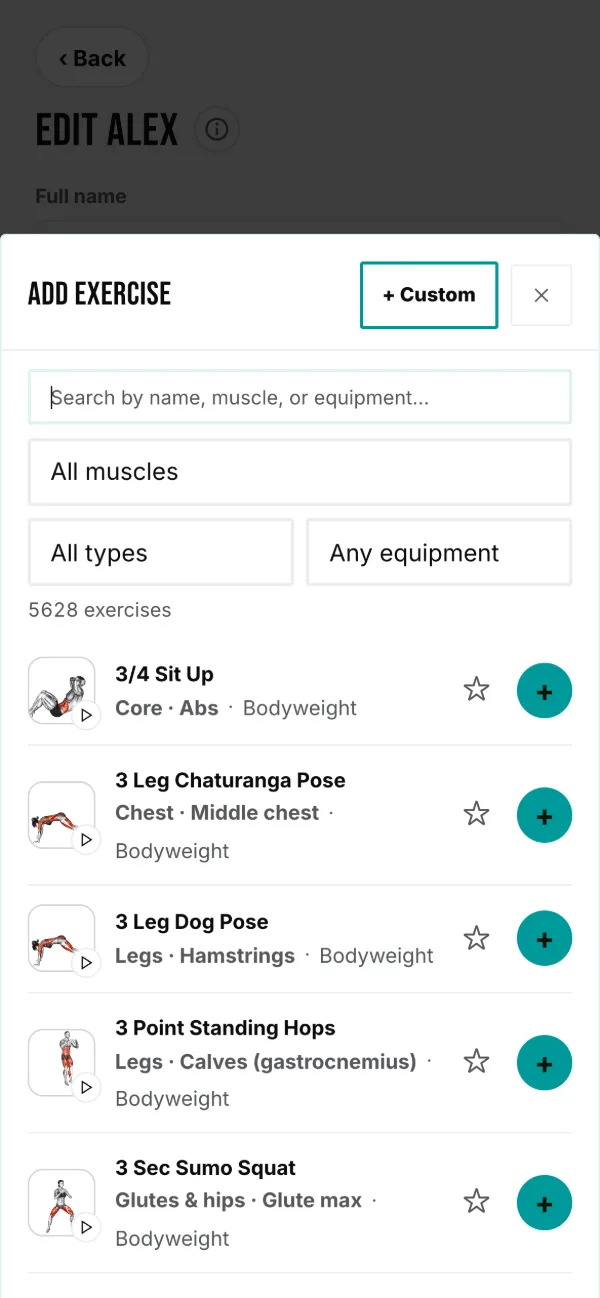
Find and add an exercise
- In a routine's Main Exercises, tap + Add Exercise.
- Type in Search by name, muscle, or equipment…. Search matches any of the three.
- Every exercise shows at first. Tap Alex’s equipment (it carries your client’s name) to see only what they can do with the equipment ticked on their profile. Exercises they can’t do say so on their row.
- Narrow further by muscle, type or a single piece of equipment, or pick ★ Favorites or Recent from the muscle list.
- Tap ☆ to favorite a move, or tap its picture to preview its demo.
- Tap + to add it. It drops into the routine and shows a ✓.
Set the numbers
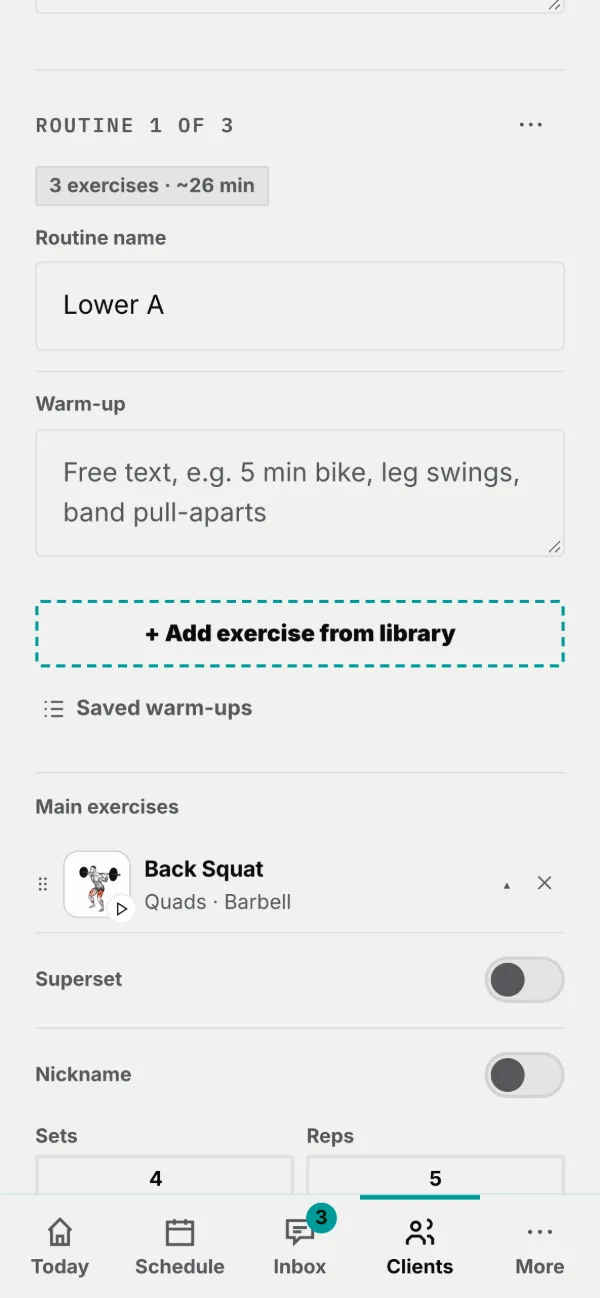
Each exercise row collapses to a summary like "3×10 · 90s rest". Tap it to expand and set:
- Sets, Reps (free text, so ranges like "8–12" are fine), and Rest (e.g. "90s").
- Superset and Weight setup: see Supersets & structure.
- A Coach note the client sees on that exercise.
New library exercises start from your default sets/reps/rest (set in Client preferences). Left blank, they show a "–" placeholder.
Exercise demos
Most library moves come with a short demo clip. You can preview it while building, and it travels with the exercise into the client's program automatically.
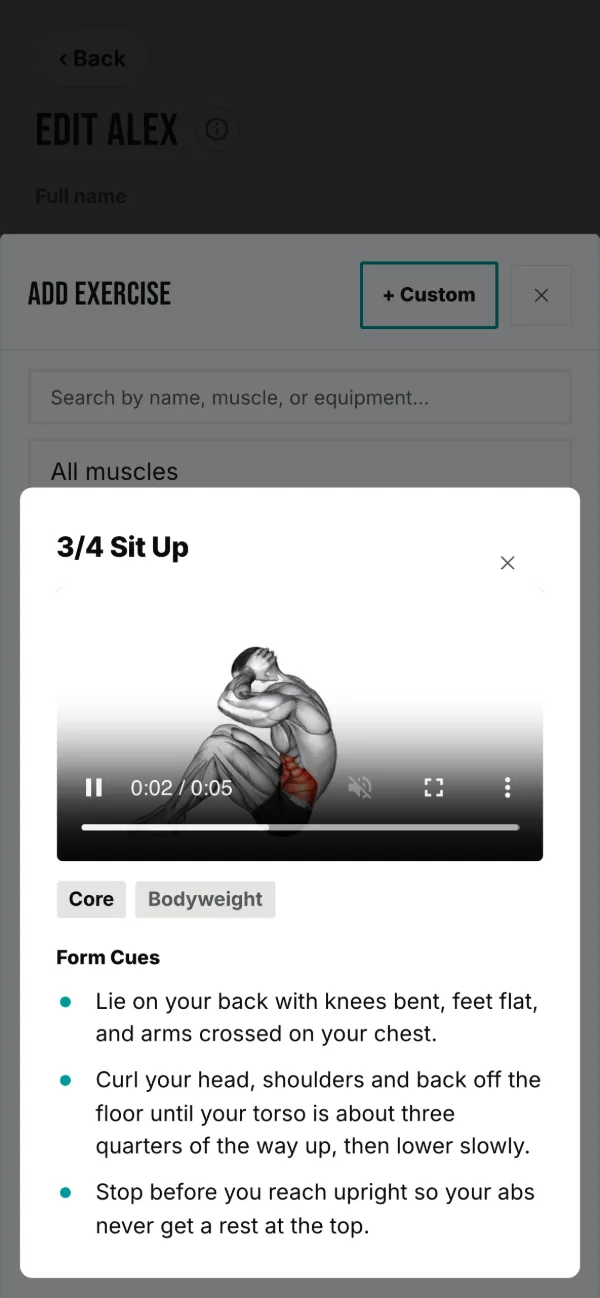
Preview a demo while building
- In the exercise picker, look for the ▶ preview button. It appears only on moves that have a demo.
- Tap it. A player opens with the clip (it loops, muted) and lists the exercise's Form Cues.
- If a move has no demo, you'll see "No demo video for this exercise."
For built-in and catalog exercises, the demo is built in. When you add the exercise to a program, its demo comes along and your client can watch it. For your own custom exercises, you choose a demo yourself (next page).
Custom exercises
Need a movement the library doesn't have? Create it once and it's yours forever. It shows up first in your picker for every client, with its demo attached.
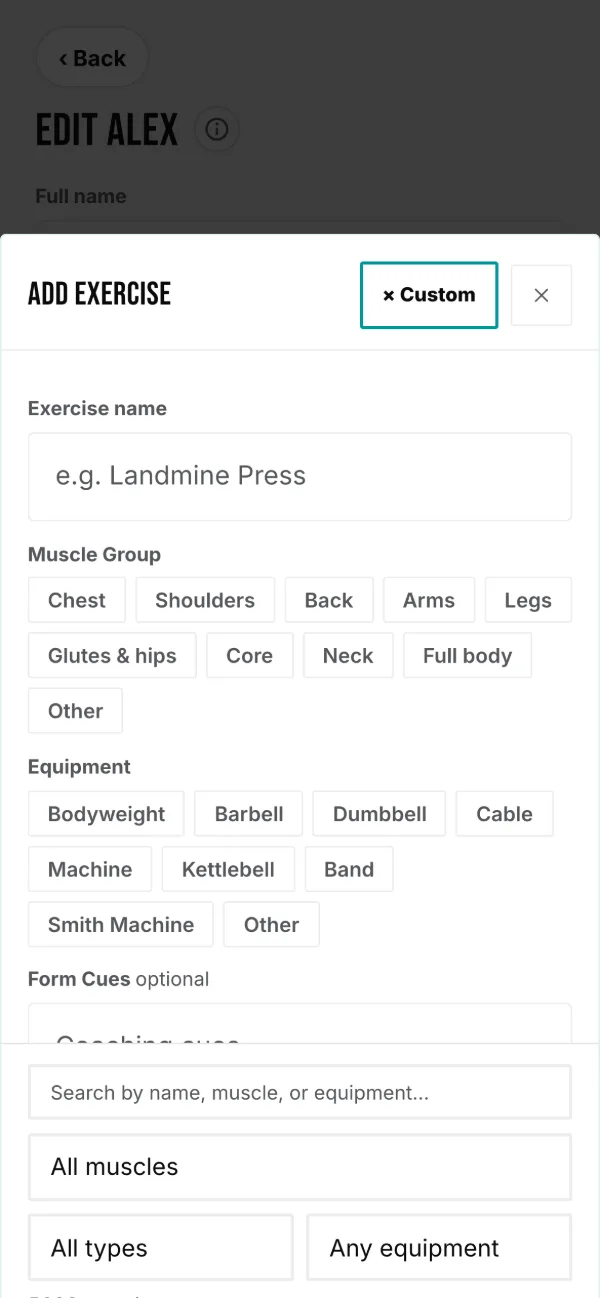
Create one
- Open the exercise picker and tap + Custom (top right).
- Enter the Exercise Name (required).
- Pick a Muscle Group chip and an Equipment chip.
- Add optional Form Cues, the notes your client sees.
- Optionally add a Demo Video: 🔎 Use from library or 🎥 Upload your own (uploads are permanent demos, never auto-deleted).
- Tap Add Custom Exercise.
Supersets & structure
Group exercises into supersets, set weights three different ways, and give every routine a warm-up and cool-down.
Supersets
- Expand an exercise row and tick Superset.
- Choose a group: GROUP 1 through GROUP 10.
- Give another exercise the same group. Exercises sharing a group are performed back-to-back.
Weight setup
| Mode | Use it for |
|---|---|
| Consistent | One target weight across all sets. |
| Variable | A different target per set, for pyramids and ramps. |
| Segmented | Drop sets or clusters: "reps @ lbs" segments that run back-to-back. |
Warm-up, cool-down & rest days
Every routine has a Warm-Up and Cool-Down block. Each takes free text ("5 min bike, leg swings") and/or library exercises added with + Add exercise from library, shown as removable pills. They are guidance, not logged sets. A rest day isn't a builder element. You schedule it as a Rest Day appointment on the calendar.
Templates
Save a program you like once, then drop it onto any future client in a couple taps. Templates live in the Program card.
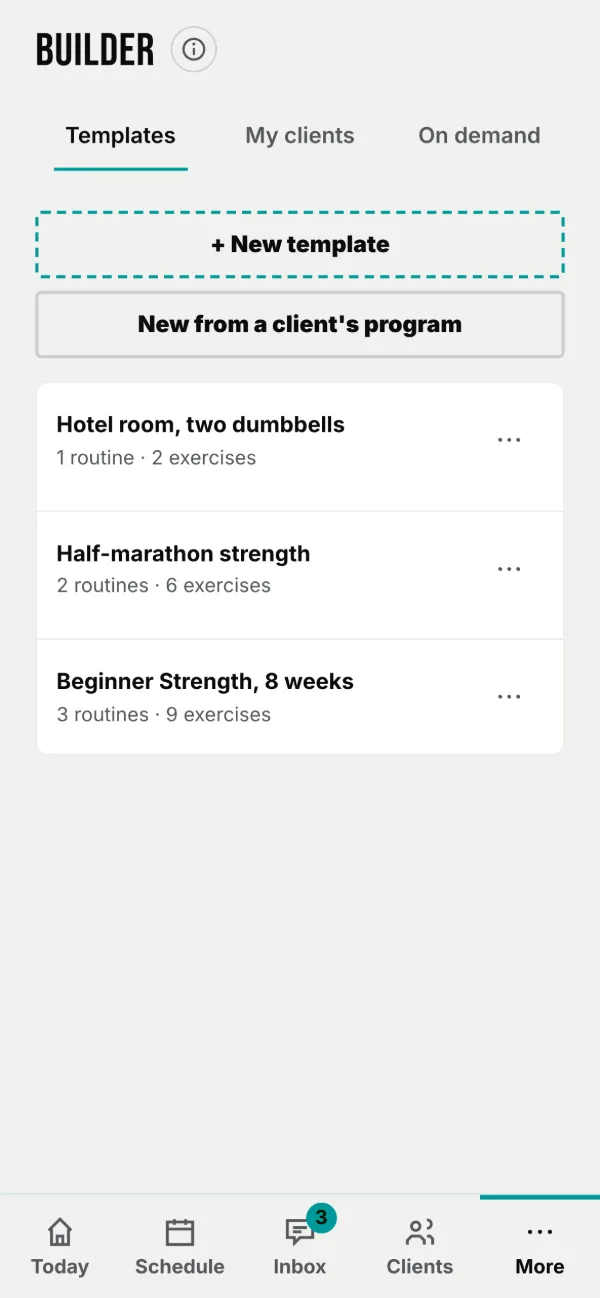
Save & apply
To save: in Builder → Templates, tap New from a client to copy all of a client's current routines into a template. (Each routine in the builder also has Save as template in its ⋯.)
- In Builder → Templates, tap the template's ⋯ and choose Apply to a client.
- Pick the client and confirm.
On demand
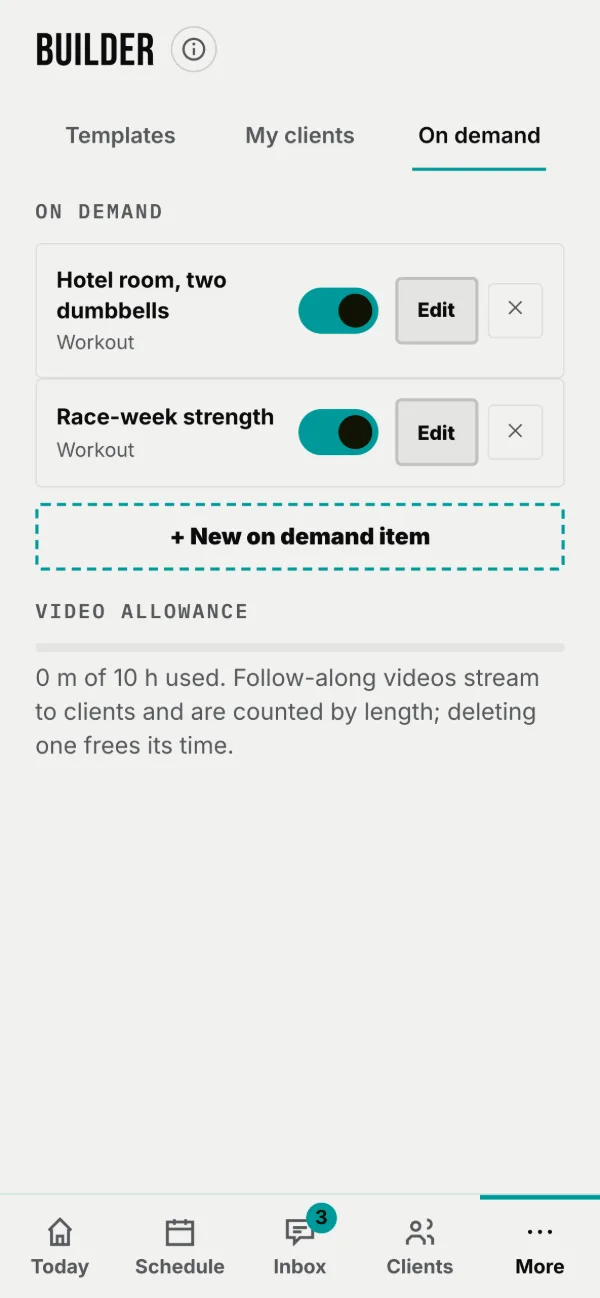
Extra workouts and follow-along videos your clients can do any day. They sit under the routine chooser on the client’s Train tab and never replace the program you wrote.
Add an item
There are two kinds. A workout points at one of your templates, so editing the template changes the item too. A follow-along video is a session you filmed.
- Tap + New on demand item and pick Workout or Follow-along video.
- Give it a title and a line for clients, such as “Bodyweight only, 15 to 25 minutes.”
- For a workout, choose the template. For a video, tap the box and choose the file.
- Turn on Available to all my clients, then Save.
A video that carries the workout
Attach a template to a follow-along video and your client logs sets while it plays. The video is pinned above the exercise, so moving to the next set never restarts it, and the demo panel is replaced by the exercise name.
The video allowance
Each plan includes storage for follow-along video: 10 hours on Solo, 30 on Studio, 60 on Gym. The meter under the list shows what you have used, and deleting a video gives its time straight back.
The calendar
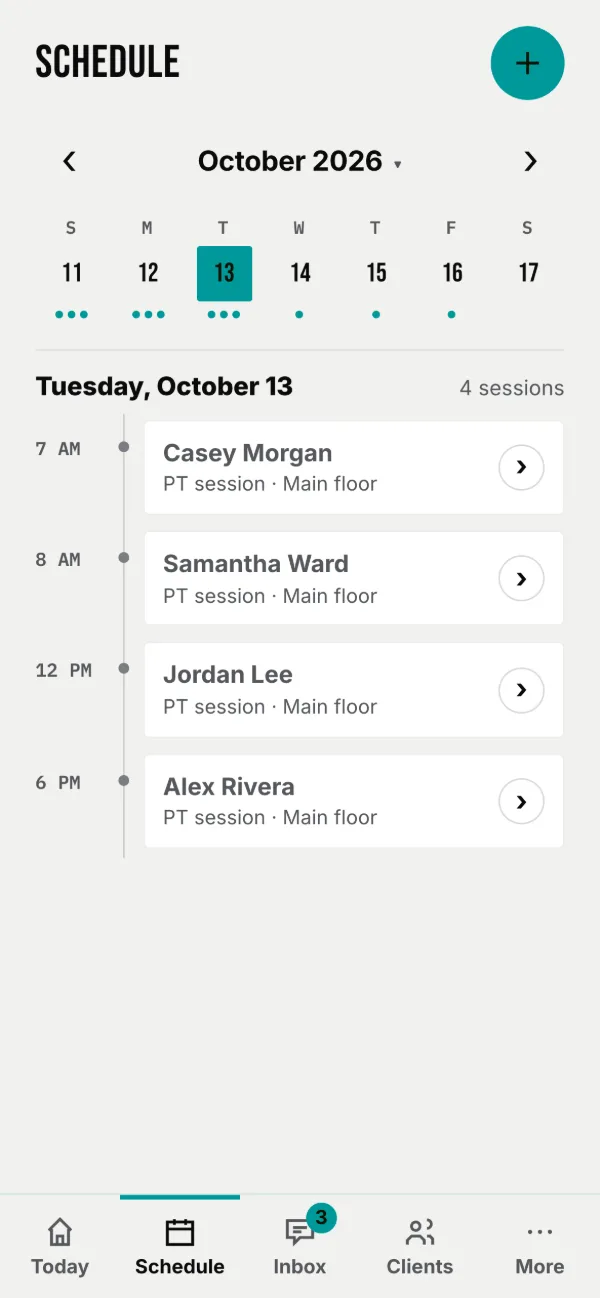
The same calendar appears on your Schedule (all clients) and in each client's Schedule (just them). The week runs across the top, and the day you pick runs down the screen as a timeline.
Getting around & booking
Swipe the week, or use the ‹ › arrows beside the month; tap the month to jump further. A dot marks a day with something on. Tap a day to see it as a timeline, each session a card, the next one ahead marked.
- Tap the round + by the title, then + Appointment. The same menu holds Edit availability, Group training and Export.
- On the dashboard calendar, choose the Client first.
- Pick a Type. Choosing Home Workout reveals a Routine dropdown.
- Set the Date (required) and optional Time, Location, Title, and Note.
- Tap Add appointment. To change one later, tap it to set its status or delete it.
Appointment types
| Type | Meaning |
|---|---|
| PT Session | An in-person session. It deducts from the package when it passes. A group class does too. |
| Home Workout | A routine to do at home. Attach one of their routines by name. |
| Rest Day | A scheduled recovery day. |
| Other Appointment | Anything else: a consult, a call, a measurement. |
Availability & client booking
Publish the times you're free and clients book themselves instantly, from their portal. You stay in charge of every slot.
- On Schedule, open the + menu and tap Edit availability, then + Publish times.
- Pick the date range, your session length, and bookable every (how often a start is offered). At 30-minute increments, an hour-long session can begin at 6:00 or 6:30.
- Set each day's windows and a location per day. Split availability like 6–9am and 5–7pm is normal, so a day can take several. Locations you've used are remembered and offered next time.
- Publish. The slots appear in every client's portal.
- Manage slots on the Availability screen, which lists every published time: Block one you can no longer offer, Reopen it later, or Move a client's booking to another open time.
- Notice windows: in Settings → Booking rules, set how many hours' notice clients must give to cancel or reschedule. The windows govern clients only; it's your diary, so you can always move your own sessions.
- Time format: choose 12 or 24 hour in Settings → Display. It carries through the whole app.
Group training
Classes with members, scheduled sessions, drop-in booking, and a register, all from + Group training in the Schedule’s + menu.
- Create a class and add members from your roster.
- Schedule a session with a date, time, location, and a capacity if space is limited.
- Members book their own spot from their portal. Not booking is how they decline; a full class shows Full.
- The register: see who's booked, mark someone absent (their session isn't spent), or book everyone in at once for a fixed-roster class.
- Cancelling a session refunds every booked member automatically.
- Classes archive rather than delete, so the record of spent sessions survives.
- Clients never see each other's names. No roster or leaderboard is exposed.
PT packages & sessions
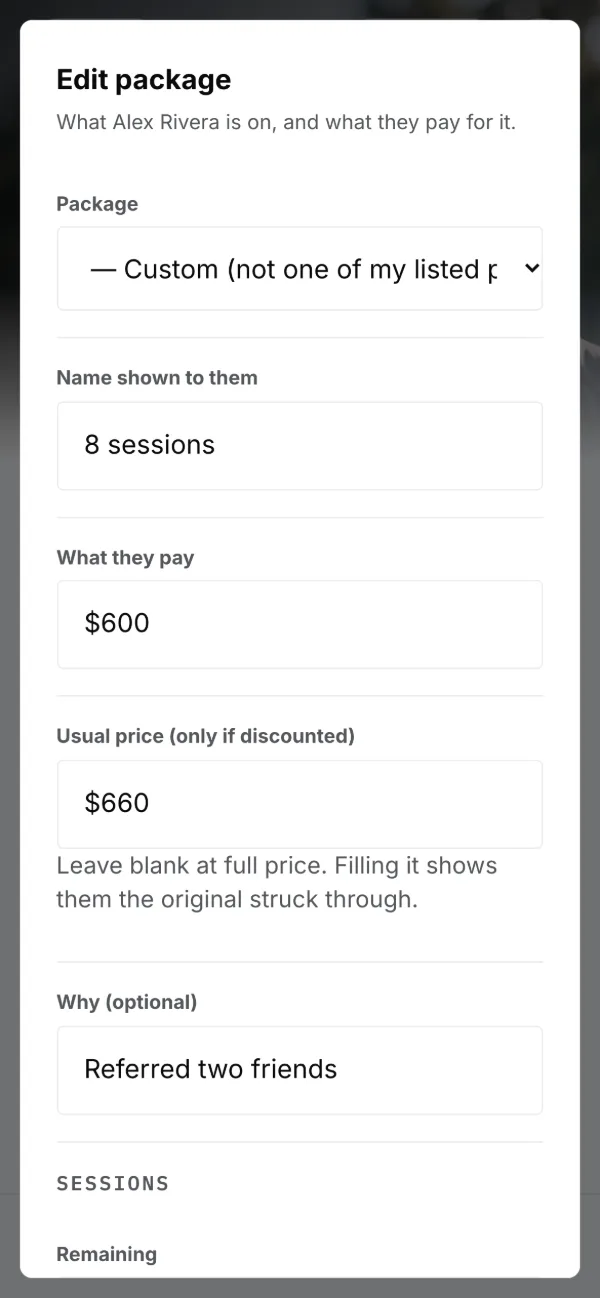
Track how many prepaid in-person sessions a client has left. Repchitect keeps the count for you and flags when someone's running low.
Set or edit a package
- Open the client's ⋯ menu, choose Details, and find the package block.
- Tap Set package (or Edit package if one exists).
- Enter Sessions remaining, then optionally the Total sessions.
How the count changes
- Logging a PT session subtracts 1.
- A scheduled PT appointment auto-subtracts 1 when its time passes.
- Undoing a session adds 1 back; Edit Package sets it outright.
The three states
| State | When | What you see |
|---|---|---|
| Healthy | More than 5 left | Normal package block. |
| Low | 5 or fewer | ⚠ "Low: 5 or fewer left", amber "N left" badge, Today "low on sessions" card. |
| Out | 0 or below | ⚠ "No sessions left"; counted under Low on sessions on Clients; logging warns first. |
Logging a PT session
After an in-person session, log it. Repchitect records it and takes one off the client's package, with guards so you never double-count.
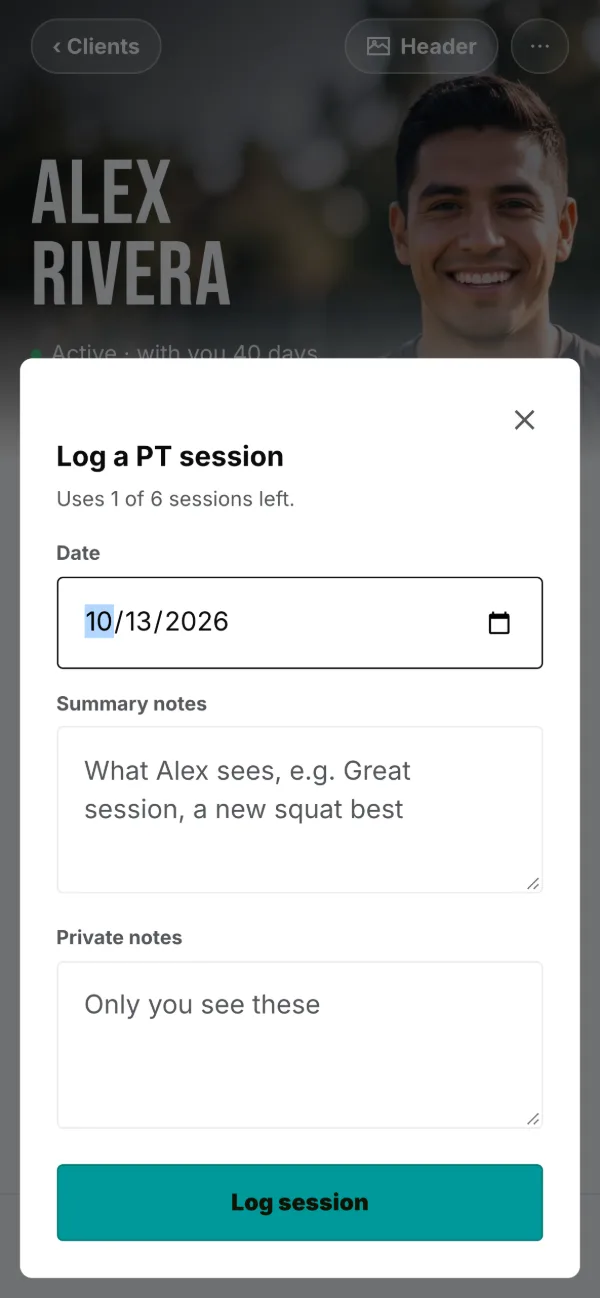
- On the client's profile, tap + Log PT session. The sheet says how many sessions it uses and how many are left.
- Set the Date (defaults to today).
- Optionally add Summary notes (the client sees these).
- Optionally add Private notes (only you see these).
- Tap Log session. It's recorded and one session is deducted.
Coaching a session
For an in-person session, open it from Today, run the workout on your phone as you coach, then log it. Nothing is lost if you step away mid-set.
- On Today, tap the Next session card. Session notes opens: the client, sessions left, workouts in the last 30 days and their streak, today's workout (the one you planned, or their first; Change picks another), and Before you start: unread messages and anything Needs attention flagged.
- Tap Start workout session. The demo plays at the top, with the clock and Finish. The set table starts from their own last heaviest sets; adjust as you go, Add set if you need one, and tap Complete set.
- Tap Finish. The sets you ticked are saved as an in-person workout, already reviewed, and you land back on Session notes with it attached.
- Add your summary and private notes, then Log session. It uses one session, closes a booked appointment for that day if there is one, and keeps the workout with the log.
Export & subscribe to calendar
Put your Repchitect schedule into Apple or Google Calendar. Subscribing keeps it updating automatically; downloading is a one-time snapshot.
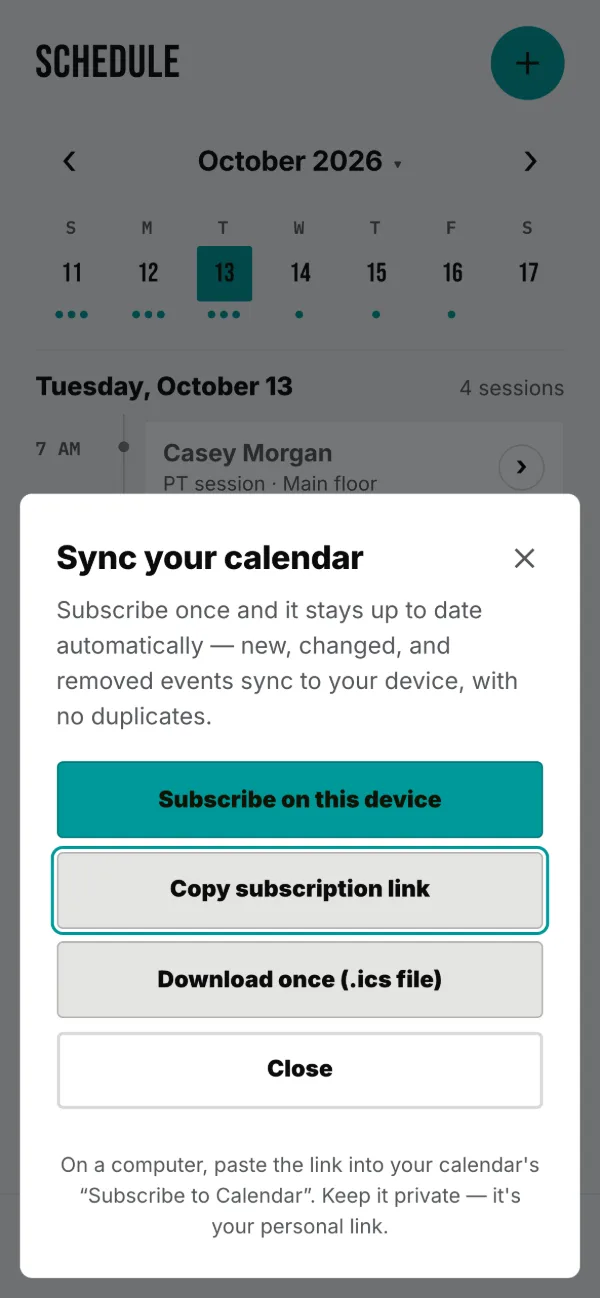
Subscribe (recommended)
- On the dashboard calendar, tap Export.
- In the sheet, use the Subscribe option. It hands your calendar app a live webcal:// link.
- Confirm the subscription in your calendar app. From then on it refreshes on its own.
On a client's Schedule (their ⋯ menu → Schedule), Export downloads just that client's calendar. Each event also has a 📅 Add to calendar icon to export it alone.
Messaging clients
A full-screen chat with one client: text, photos, and video, plus cards for every workout they complete. Switch clients without leaving the screen.
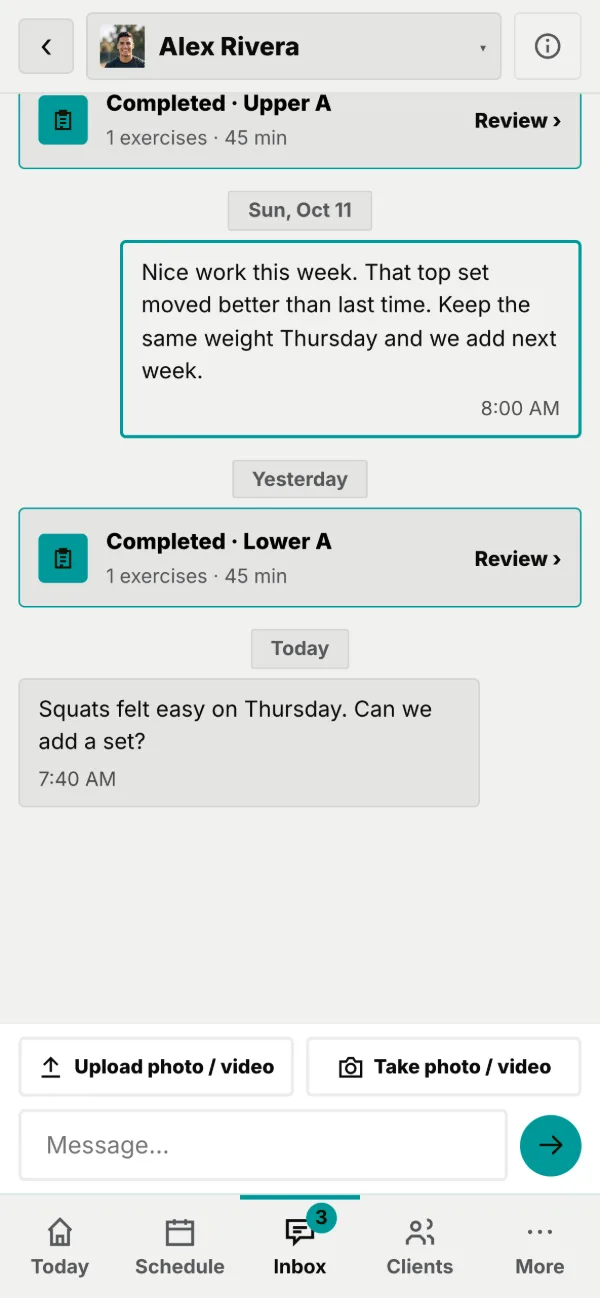
Open a conversation & send
Reach a thread three ways: Messages in a profile’s ⋯ menu, Inbox → Messages, or the messages card on Today. The header shows the client's name as a dropdown. Tap it to jump to another client. The ‹ returns you where you came from.
- Type in the Message… field and tap → (or press Enter).
- To attach media, tap Upload photo / video or Take photo / video.
- Photos attach instantly; videos upload with a progress bar. An attachment chip appears. Tap ✕ to remove it.
- Add any text and send.
Your inbox
One place for everything waiting on you, in four tabs: conversations to answer, workouts to review, check-ins and forms that came in, and inquiries from your Trainer Market Page.
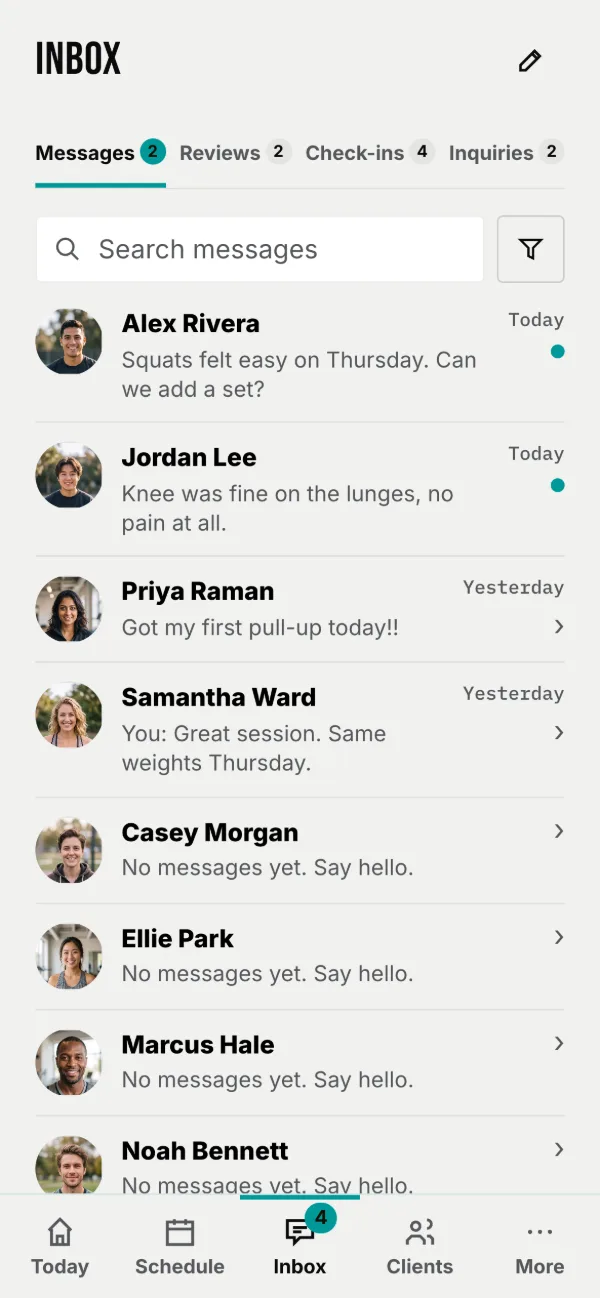
Tabs at the top switch between Messages, Reviews, Check-ins and Inquiries, each with its count. The Today cards and profile links open the right tab. On Messages, each row is one client with the last message and the time, and a dot when it is unread; search by name, or show only unread. The round button by the title starts a new message.
- Tap Inbox, make sure Messages is selected.
- Tap a row to open its full-screen thread. Opening it marks the messages read and clears the badge.
The Reviews tab lists workouts awaiting your review. That's the next page.
Reviewing workouts
When a client logs a workout, you review it: see every set they recorded, watch any form-check clips, and reply with a note or a video. The same review screen opens from three places.
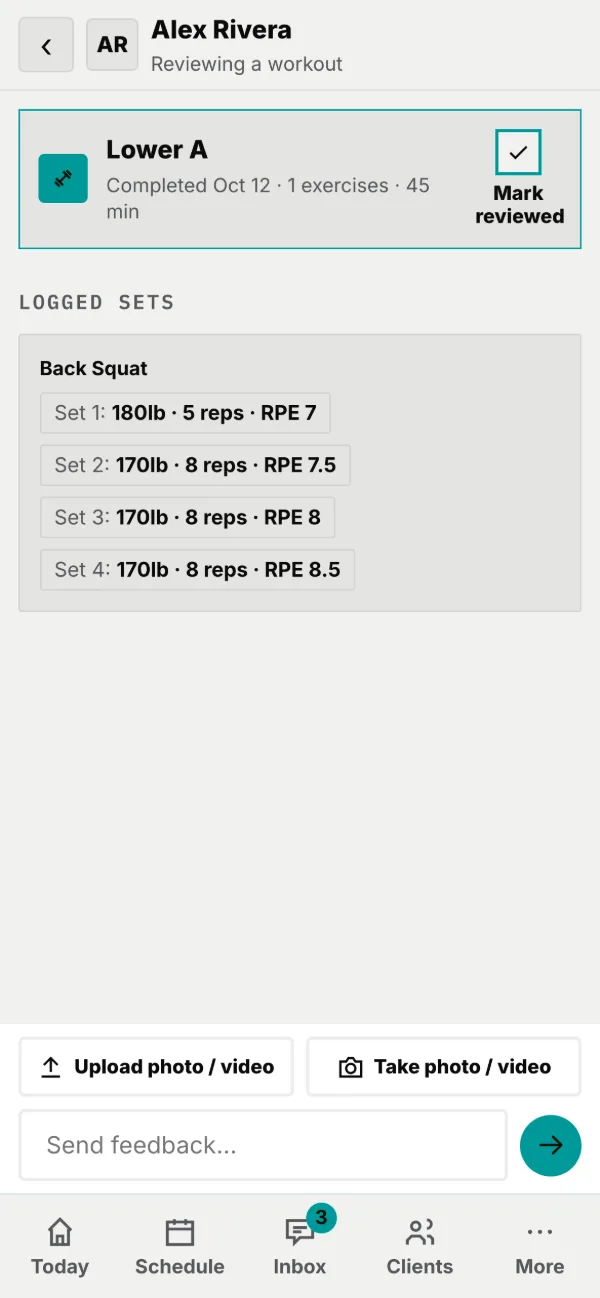
Three ways in, one screen: Inbox → Reviews, To review on a client's Program tab, or a "Completed · …" card inside a message thread. You'll see the routine summary, any client note or exercise substitutions, form-check videos, and Logged Sets with per-set weight, reps, and effort.
- Type in Send feedback… and tap →. Your note sends and the workout leaves your review list.
- To reply with a clip or image, use Upload photo / video or Take photo / video.
- Nothing to add? Tap the Mark Reviewed checkbox to clear it without a note.
Community board
A place where a group of your clients can see each other. It is the only screen in Repchitect where that happens, and it takes two people to open it: you invite, they accept.
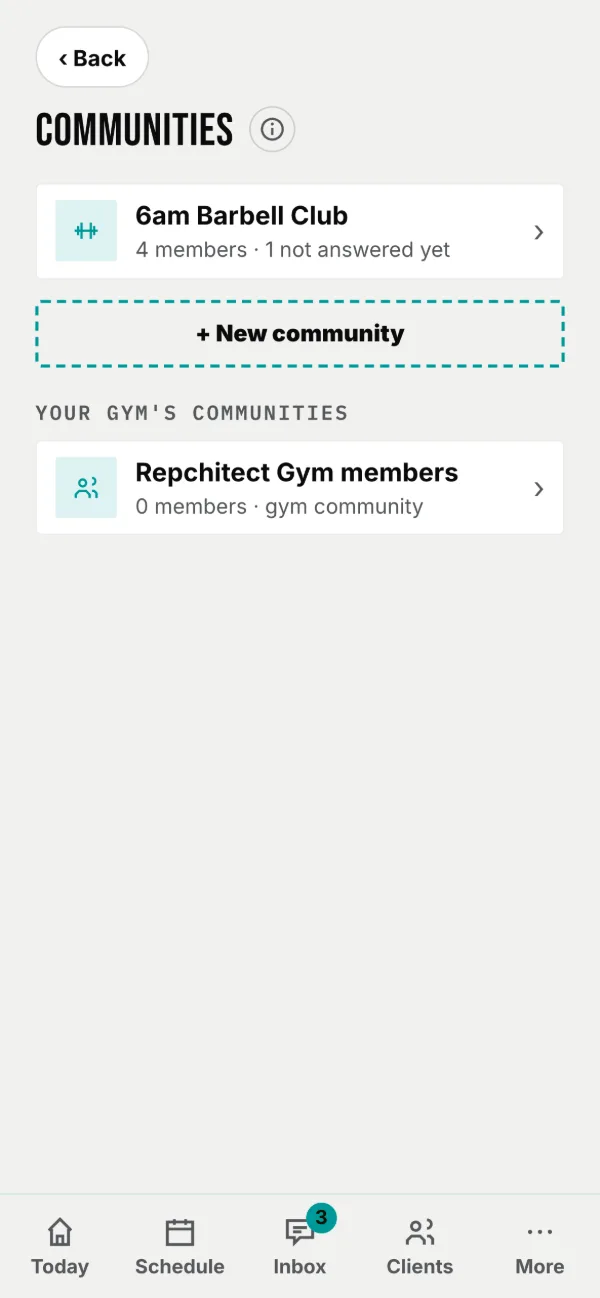
Make a board
A board is one cohort. Your 6am group and your beginners can each have their own, and members of one never see the other. Name it something members will recognise, then open it, tap the settings button beside its name, and tap Members to invite people.
- Tick the clients you want. Each of them is asked, not added.
- They see the board’s name and nothing else until they tap Join.
- Once in, they post, reply and react, and see each other as a first name and an initial.
What only you can do
Pin a post or delete anyone’s post from the ⋯ beside it, and share a resource or a workout from the + by the message box. A workout is either one of your On Demand workouts (on your own communities) or a copy of one routine from your templates; members tap it to start, and it never counts as their program. A resource you post to the board becomes readable by every member of that board, whatever its own visibility says, so use it deliberately.
How it looks
In the community’s settings, give it one of twelve icons or upload an image. A square picture works best; a wider one is trimmed to its middle square. Members see the image once they have joined; an invitation shows the icon.
Posting
The board reads like a chat: your posts on the right, everyone else’s on the left, newest at the bottom by the message box. Text up to 2,000 characters; tap + for a photo or a video up to 90 seconds. Replies are flat: they hang under the post in the order they were written, with no threads inside threads. There are five reactions and each person can leave one of each.
Your profile & settings
The gear icon opens Settings. It’s a menu: tap a row to open that section. Your profile here is what your clients see about you.
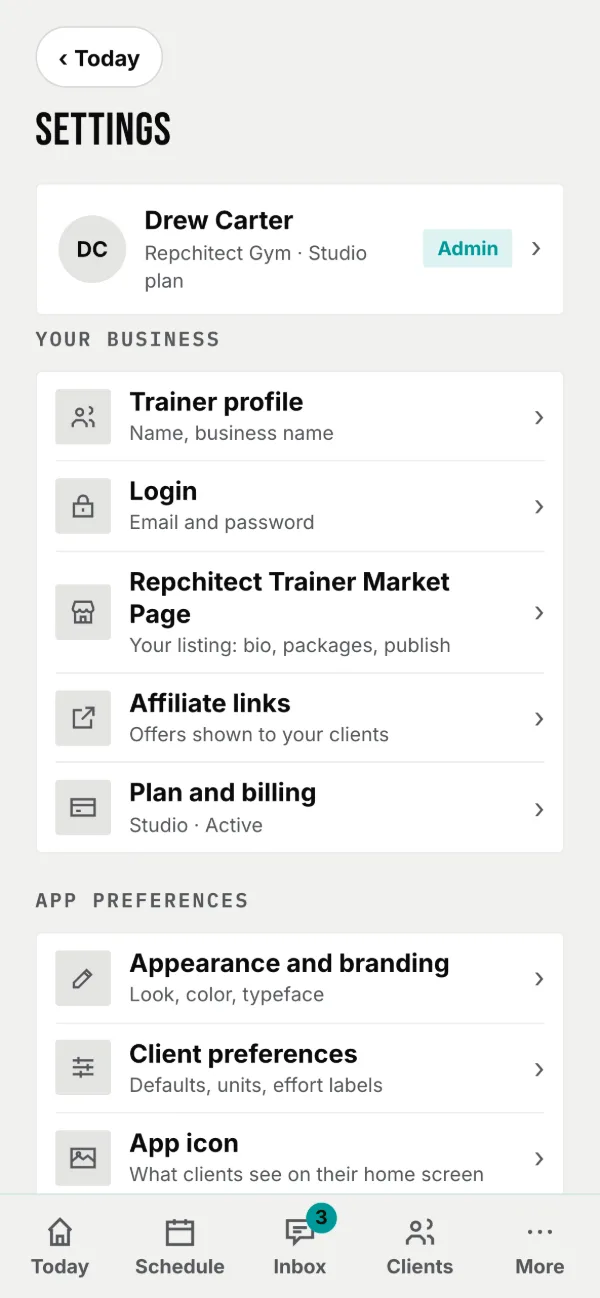
Open it from the gear on Today, or More → Settings and info. Your account sits at the top as a card; tap it for Trainer profile. The menu then has two groups. Your business holds Trainer profile, Login, Repchitect Trainer Market Page, Affiliate links, and Plan & billing. App preferences holds Appearance & branding, Client preferences, App icon, Badges, Booking rules, Notifications, Display, and Menu order. Below them sit Guide & support and Log out. These profile fields appear to your clients. Leave any blank to hide it.
- Open Trainer profile and fill in Your name and Business name. Your business name (or your gym's) is the brand at the top of Today and of your clients' app.
- Your bio, city, website, contact email, phone, and packages now live on Repchitect Trainer Market Page: the About you and City fields, and the Contact and Packages sections.
- Tap Save Profile.
The Display section sets Text Size and High Contrast for your dashboard, plus whether times read in 12 or 24 hour across the app. It is separate from your client-facing brand, and it saves instantly.
Your Trainer Market Page
A page strangers can find: your bio, specialties, packages with real payment links, and a contact form that delivers to your Inbox.
- Where it lives: repchitect.com/t/your-name, and once published, the public directory at repchitect.com/find (browse by location, specialty, and coaching style, with a map).
- Edit it from Settings → Repchitect Trainer Market Page. Nothing is live until you hit Publish.
- Packages carry real payment links (Stripe, Venmo, Cash App, or PayPal), plus an "other ways to pay" note for Zelle or cash, shown as plain text.
- Before & after: up to five pairs. A pair with a client attached needs their recorded consent before it can go live; withdrawing consent takes it down.
- Shared by your clients: a client can share a before and after from their own app. It waits here with their name and the date; tap Add to my page to publish it. Their share is the consent, so there is nothing to tick. If they stop sharing, the pair comes off your page and its public copies are deleted.
- Inquiries from the page land in your Inbox's third tab and email you. Junk files itself under Spam with a Not-spam rescue.
- Contact details typed here also show on your own clients' coach card; each "Show on page" tick controls the public copy separately.
Appearance & branding
Pick a look, then make it yours. Your look and brand appear on your dashboard and every one of your clients' portals, and the page previews itself as you choose.
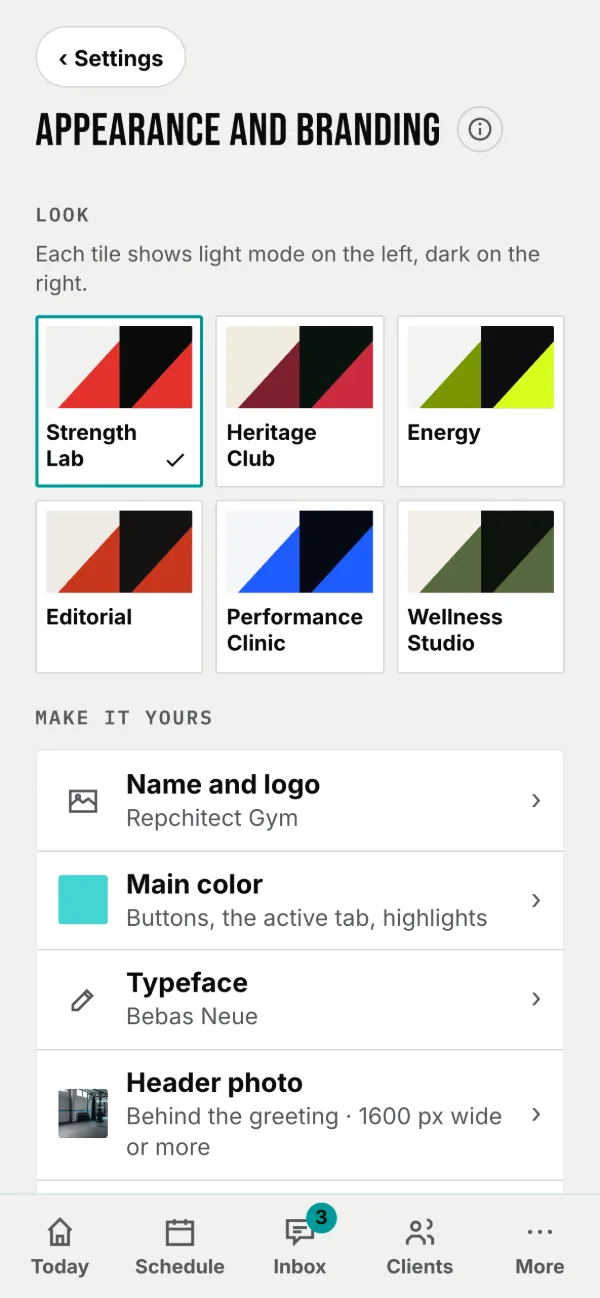
- Open Settings → Appearance & branding.
- Pick one of six looks: Strength Lab, Heritage Club, Energy, Editorial, Performance Clinic or Wellness Studio. Each tile shows it light and dark. A look sets the palette, corners, typefaces and header photo together.
- Under Make it yours, change any part of it: Name and logo; Main color (twelve swatches, or type your brand color as a hex code); Typeface for greetings, titles and big numbers; Header photo, one of ours or your own landscape photo at least 1600 px wide; and Corners, sharp, soft or rounded.
- Each page has its own Save. Your clients see the change on their next open.
- Pick Your view mode for your own dashboard: Auto, Light, or Dark. Auto is the default and follows your phone's light or dark setting.
Your app icon
When a client saves the portal to their phone, this is the icon and the name on their home screen. Yours, not ours.
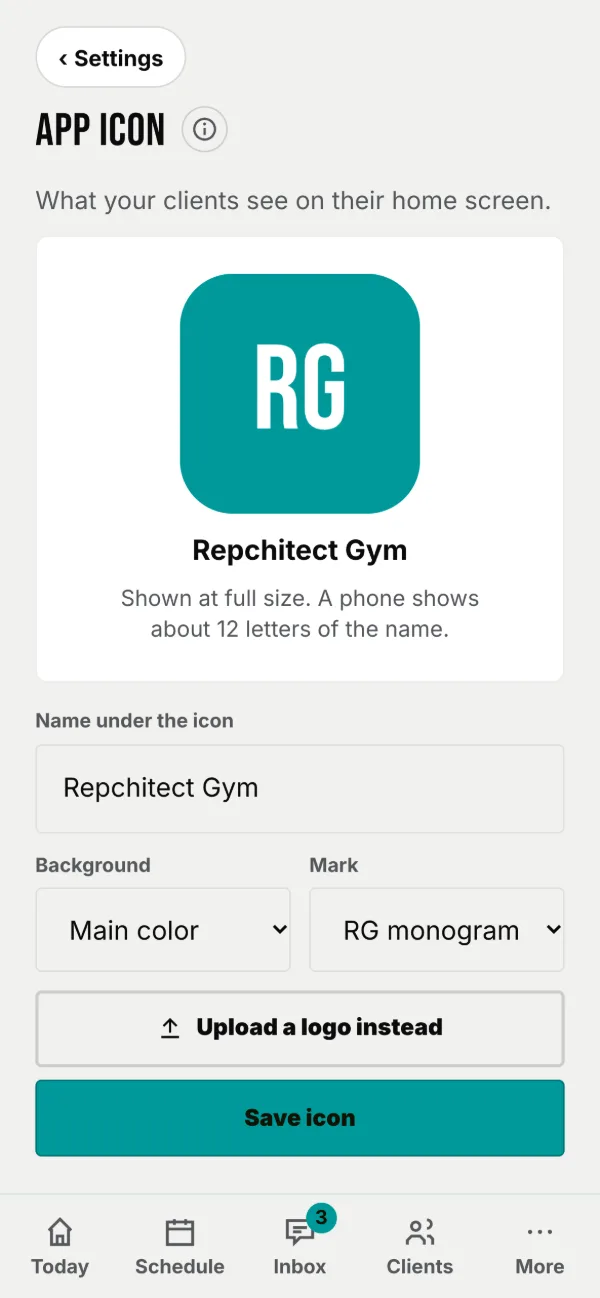
Set it up
- Type the Name under the icon.
- Choose a Background: your main color, black, white, or your own color.
- Choose a Mark: a monogram of your name's initials, drawn in your look's title typeface, or your logo. Upload a logo instead takes a PNG, JPEG or WebP.
- Tap Save icon.
The icon is always a solid square rather than transparent, because phones put an icon on a background of their own choosing and a transparent one is a coin toss between black and white. The large preview shows exactly what gets built, and changing the name, background or mark rebuilds it straight away. With no logo at all, the monogram means you still have an icon of your own.
Notifications
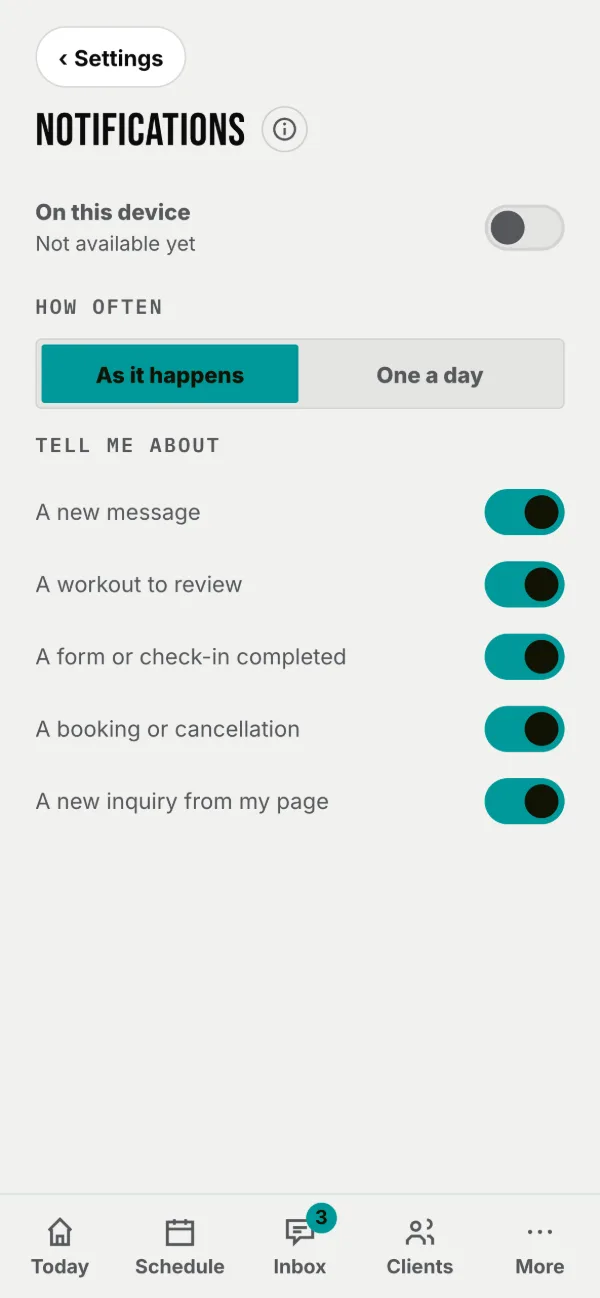
A nudge on your phone when a client needs you. Off until you turn it on, and separate on every device.
Turn them on
Flip On this device and your phone asks once. Each device is its own subscription, so allowing it on your phone does nothing for your laptop.
Five things you can be told about: a new message, a workout to review, a form or check-in completed, a booking or cancellation, and a new inquiry from your public page.
All day, or once a day
Under How often, As it happens sends each event as it arrives. One a day sends a single morning summary instead, counting messages, forms, bookings and workouts since yesterday.
A notification is a title and one line, never the contents of a message, so nothing private appears on a lock screen.
Plan & billing
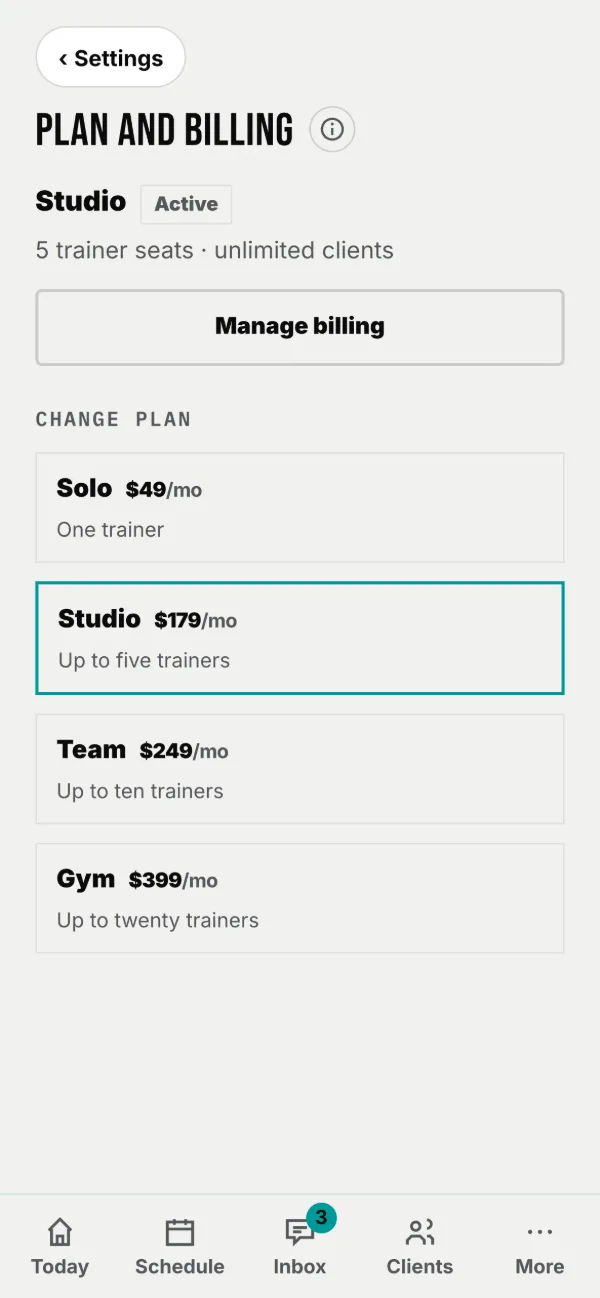
Four plans, priced by how many coaches you have. Clients are unlimited on every one of them.
The plans
- Solo, $49 a month: one trainer.
- Studio, $179 a month: up to five trainers.
- Team, $249 a month: up to ten trainers.
- Gym, $399 a month: up to twenty trainers.
Seats count coaches, never clients. You are never charged more for coaching more people, and every plan starts with a 14-day free trial. A card is taken at signup and first charged when the trial ends, so you can cancel before then. From Studio up, a single extra trainer seat is $25 a month if you need one more coach without moving up a plan.
Payments run through Stripe, and Manage billing opens their portal to change a card or cancel. We never see or store your card.
If a payment fails
You get a banner and a week of grace. During it everything still works. After it, the one thing that stops is adding new clients.
Client preferences & links
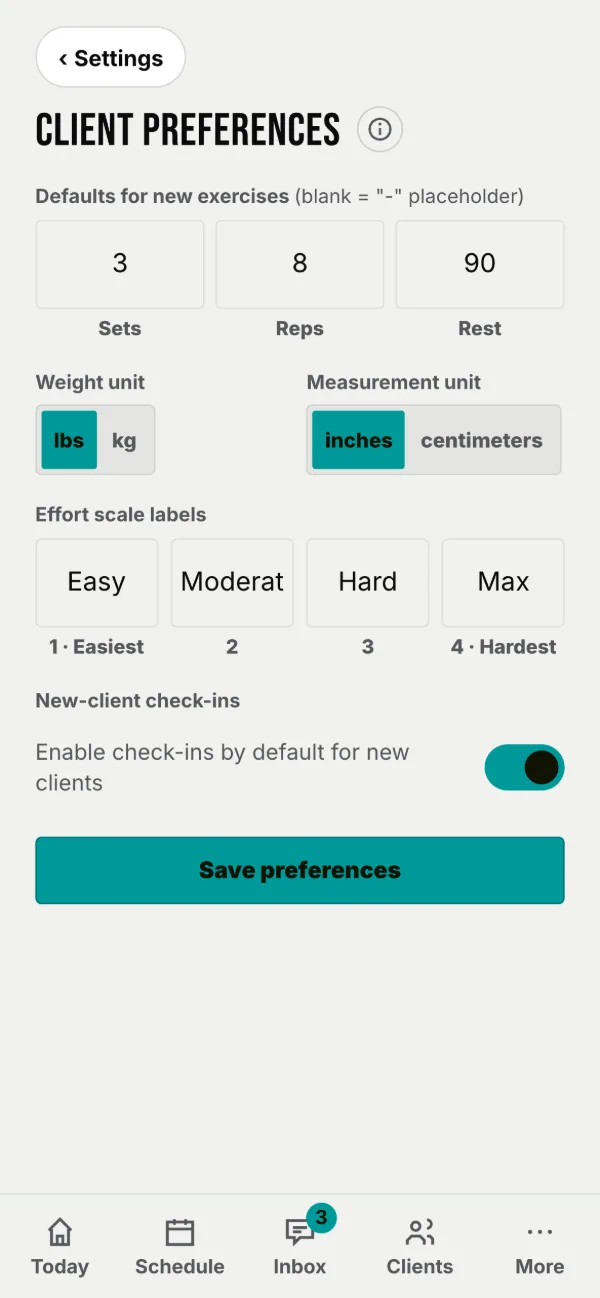
Set the defaults that apply to all your clients, and the partner offers they see.
Client preferences
- Default Sets / Reps / Rest: pre-fills every new library exercise. Blank shows a "–" placeholder.
- Weight Unit: lbs or kg. Measurement Unit: inches or centimeters.
- Effort Scale Labels: rename the four levels (defaults Easy / Moderate / Hard / Max).
- New-Client Check-Ins: turn check-ins on automatically for every new client.
Tap Save preferences when done.
Affiliate links
- Under Affiliate Links, fill a row's Brand, Offer, and URL.
- Tap + Add Affiliate Link for more, or ✕ to remove a row.
- Tap Save Affiliate Links. (Empty rows are dropped.)
Roster numbers & package health
The top of the Clients tab is your roster at a glance: who is active, who is running low on sessions, and who is paused.
Three tiles sit at the top, and each is also a filter: tap one to show only those clients, tap it again to show everyone.
| Tile | Counts |
|---|---|
| Active | Clients who are not paused. |
| Low on sessions | Clients with five or fewer left, none left included. It is outlined in your color when anybody is in it. |
| Paused | Clients you have paused. |
Check-ins & nutrition
Have clients report in on a cadence you set, and give them daily nutrition targets to log against. Both live on the client's Check-ins tab.
Set up check-ins
- Open the client's Check-ins tab and tap Settings ›.
- Turn on Check-ins enabled and choose Every N days (default 7) or On a weekday.
- Tap Edit questions to change what the check-in asks. It is one form for all your clients.
- Tap Save check-in settings. The summary above updates at once.
Their latest check-in shows on the profile with each topic's rating and any comment. To enable check-ins for every new client, use the toggle in Client preferences.
Set a nutrition plan
- On the same tab, open Nutrition plan.
- Write the full picture, each section behind its own on/off toggle: your rationale, daily targets (single numbers or ranges, like "170–220g protein"), an eating window, suggested foods, suggested meals for each weekday, and supplements.
- Tap Save. Supplements sync into the client's habit list automatically. Remove one from the plan and its habit goes with it.
Forms
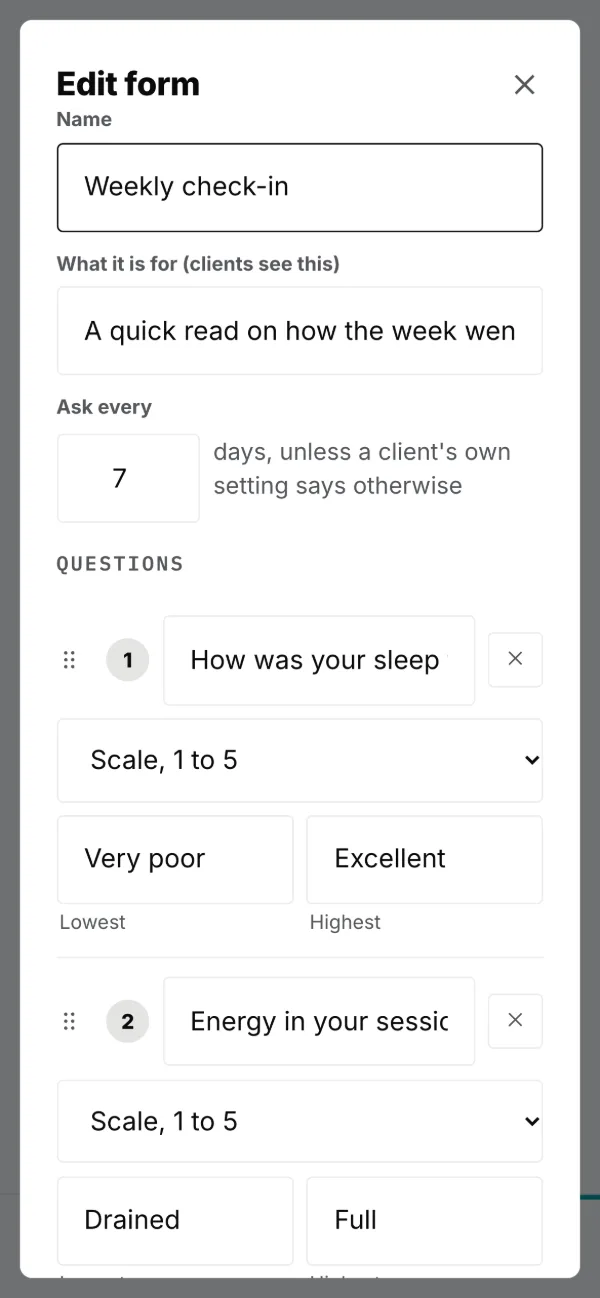
Questions you send to one client, one screen at a time. Your weekly check-in is the first one, already written for you.
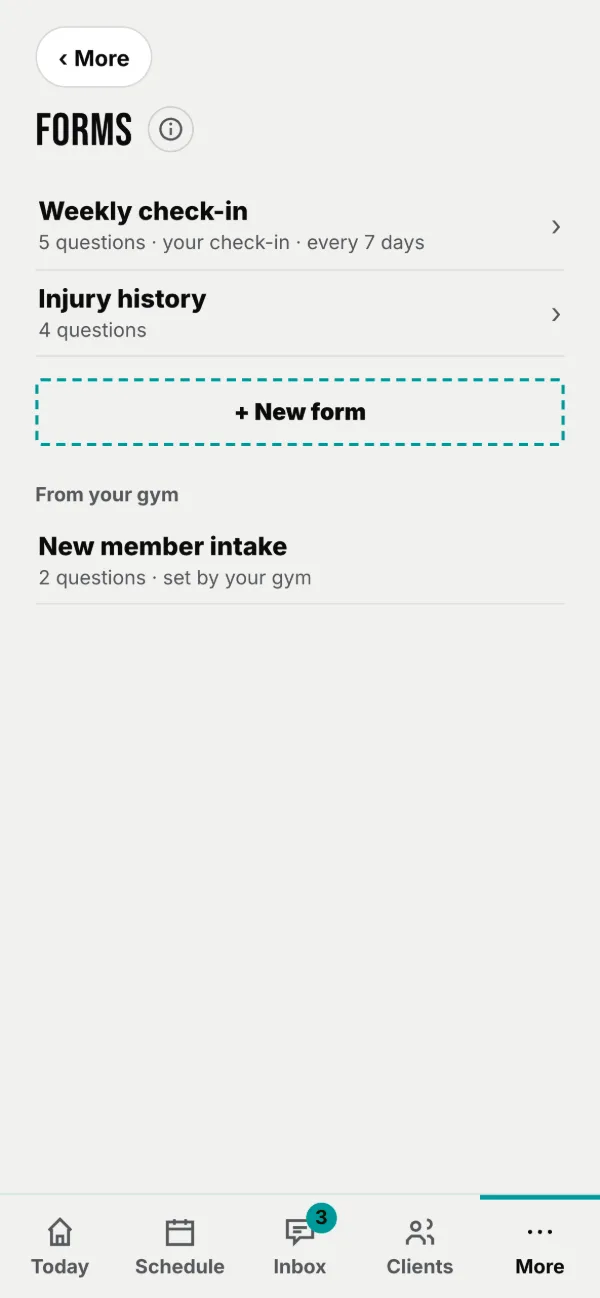
Write a form
- Name it, and write the line clients read under the title.
- Tap + Add a question, type the question, then choose its type.
- Reorder with Up and Down, then Save.
Five types: Short answer, Scale, 1 to 5, Pick one, Pick any and Yes or no. A scale lets you word both ends, and the two pick types take a comma-separated list of options.
Send one
It arrives as a card on their Today screen. They answer one question per screen, and the answers come back as a summary line in your thread with them.
Your check-in is a form
The weekly check-in is created for you the first time you open this screen, and it works like any other form except that it repeats on a cadence instead of being sent. Set how often in Ask every, and edit its questions here or from a client’s Check-ins tab. It cannot be sent as a one-off, because that would start a second series alongside the recurring one.
Resources & articles
Files, links and articles your clients open from their More screen. Everything you want to hand over that is not a workout.
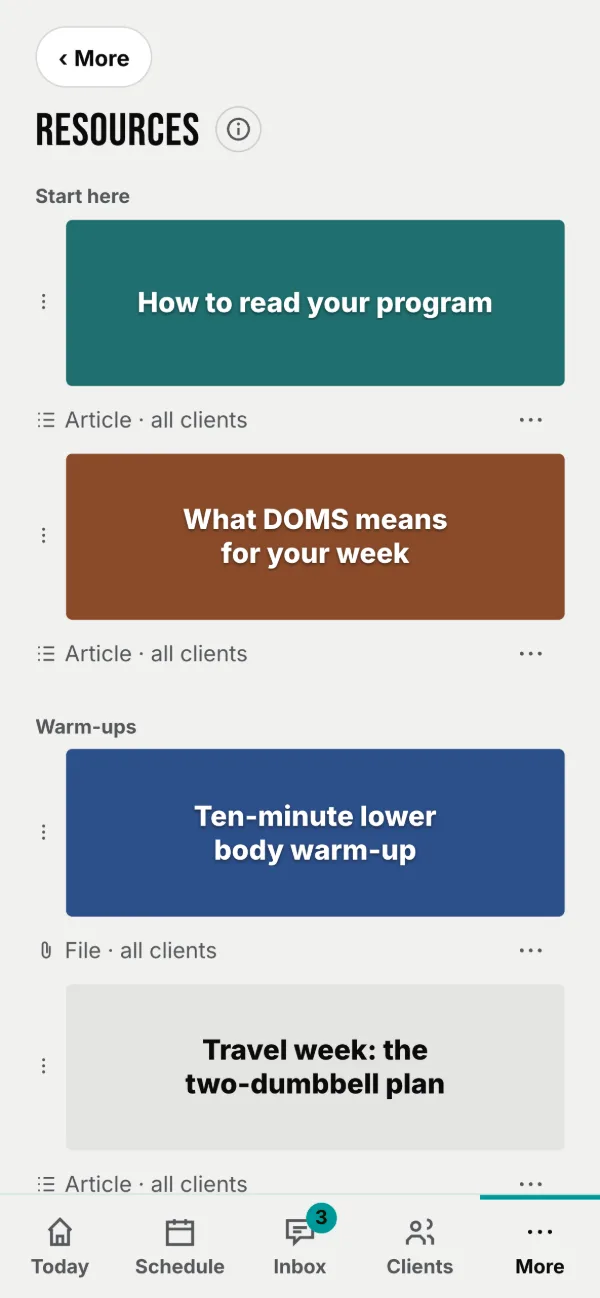
Add a resource
Three kinds. A Link opens a page in the browser. A File is a PDF or document up to 25 MB. An Article you write here, with headings, bold, lists and links.
- Pick the kind, give it a title, then add the address, the file or the words.
- Leave Visible to all my clients on, or turn it off and tick the ones you mean.
- Save. It appears under More on their side, and anything they star sorts to the top.
Your own categories
The headings are yours to write. Tap Categories, type a name, and it becomes a section on your list and on your clients’. Rename one in place, reorder them with the arrows, and pick the category on each resource when you save it.
Clients see your sections in the order you put them in, so the first heading is the one they read first. Anything with no category sits at the end.
Publishing an article
An article can also live on your public page, at your page’s address followed by the article’s name. Anyone with the link can read it, which makes it something to share rather than something private.
Sharing with your gym
If you coach at a gym, anything you have built can be offered to the gym so every coach gets it. Offering costs you nothing: you keep yours.
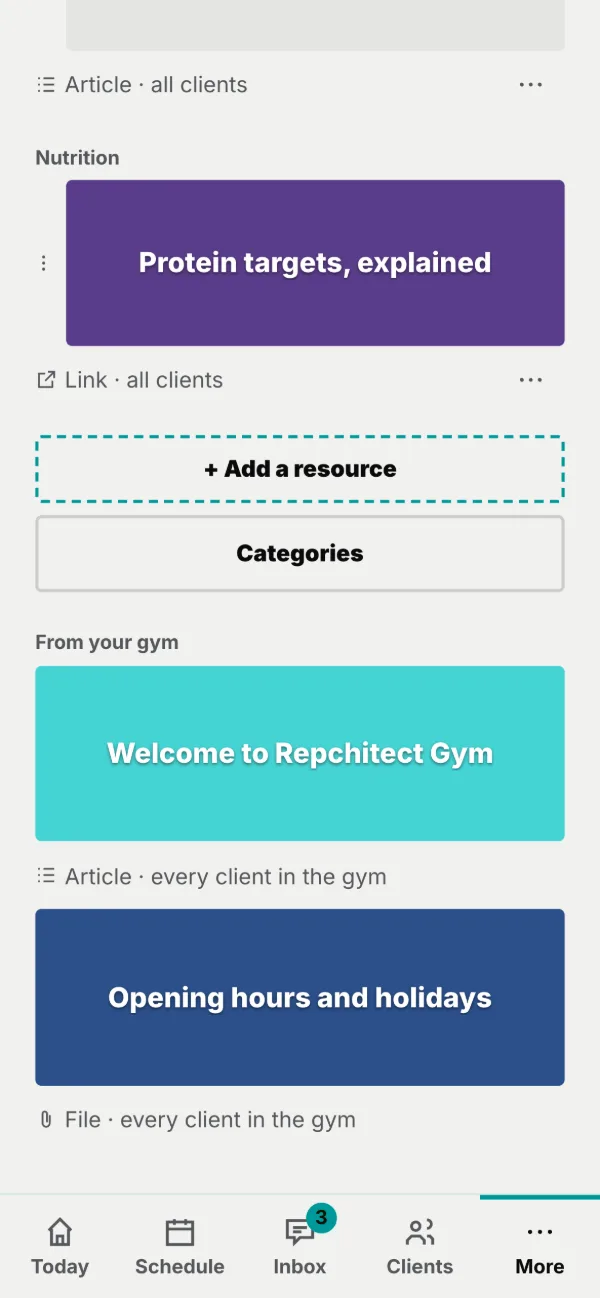
Offer something
Resources, forms and automations each carry an Offer to my gym switch on your own rows. Turning it on lets your gym’s admin see that one item. It does not hand it over and it does not publish it to anybody’s clients.
- Turn the switch on. Your admin sees it under Offered by your coaches, in the gym's Library.
- If they add it, the gym gets a copy. Yours is untouched and still yours to edit or delete.
- Turn the switch off any time. That withdraws the offer; a copy the gym already took stays theirs.
What the gym shares back
Under From your gym you will see the gym’s own resources and forms. Gym resources reach every client in the gym, yours included, with nothing for you to do. Gym forms you can send to your clients exactly like your own; only the admin can change the questions.
Automations
Rules that run on their own. When something happens, an optional wait, then one action, in your name.
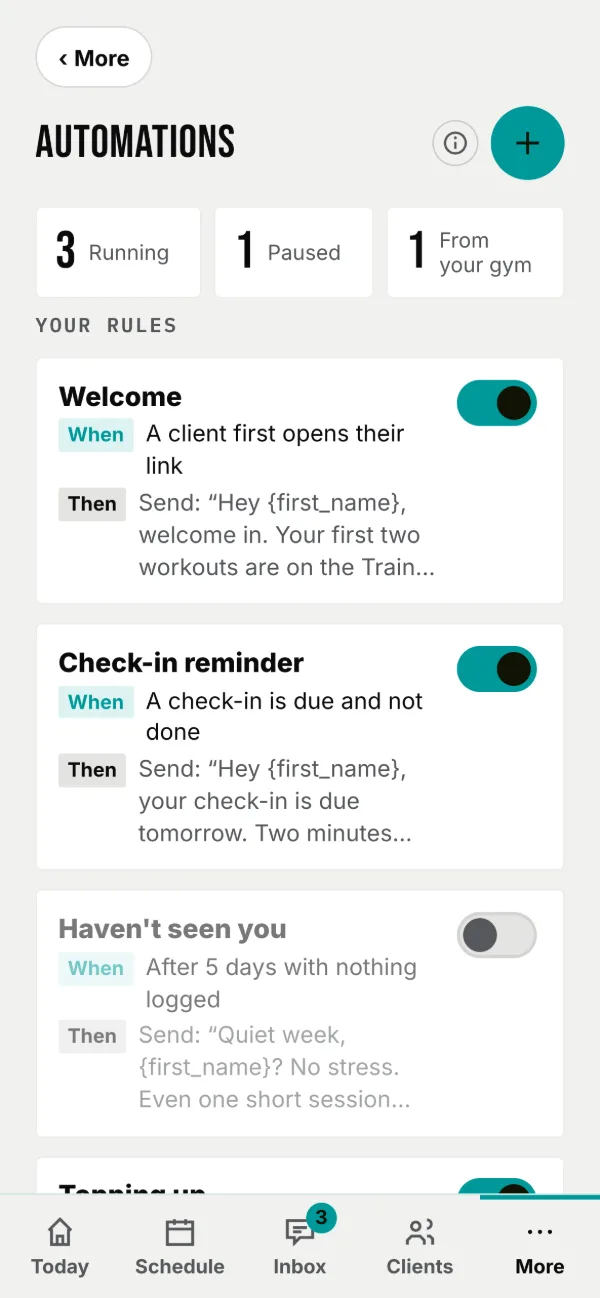
Build a rule
The page opens on three counts: rules Running, rules Paused, and rules From your gym, which you can read and not change. Your own rules follow, each with its switch. Tap a rule to edit it; the top of the editor says how many times it has sent and when it last did.
- Name it, then choose a trigger under When.
- Choose a Wait: now, one day, three days or seven.
- Choose the action under Then, and write the message if that is the action.
- Decide Once per client, read the Reads as line, and save.
Twelve triggers: a client is added; a client opens their link for the first time; days with nothing logged; a check-in is due and not done; a form is completed; a session is booked; a session is tomorrow; the program is updated; a workout is logged; a personal record is set; a badge is earned; sessions are running low.
Four actions: send a message, send a form, point them at On demand, or email yourself.
In a message, {first_name} becomes their first name. Nothing else is filled in, so anything else in braces arrives exactly as you typed it.
The three starters
With no rules of your own, the list offers Add the three starters: a welcome, a check-in reminder, and a nudge after five quiet days. The third arrives switched off, because it is the one that can nag.
Progress, records & history
The client's History tab, and Progress · View all on their Overview, hold a client's totals, measurements, personal records, and a full timeline of everything they've done.
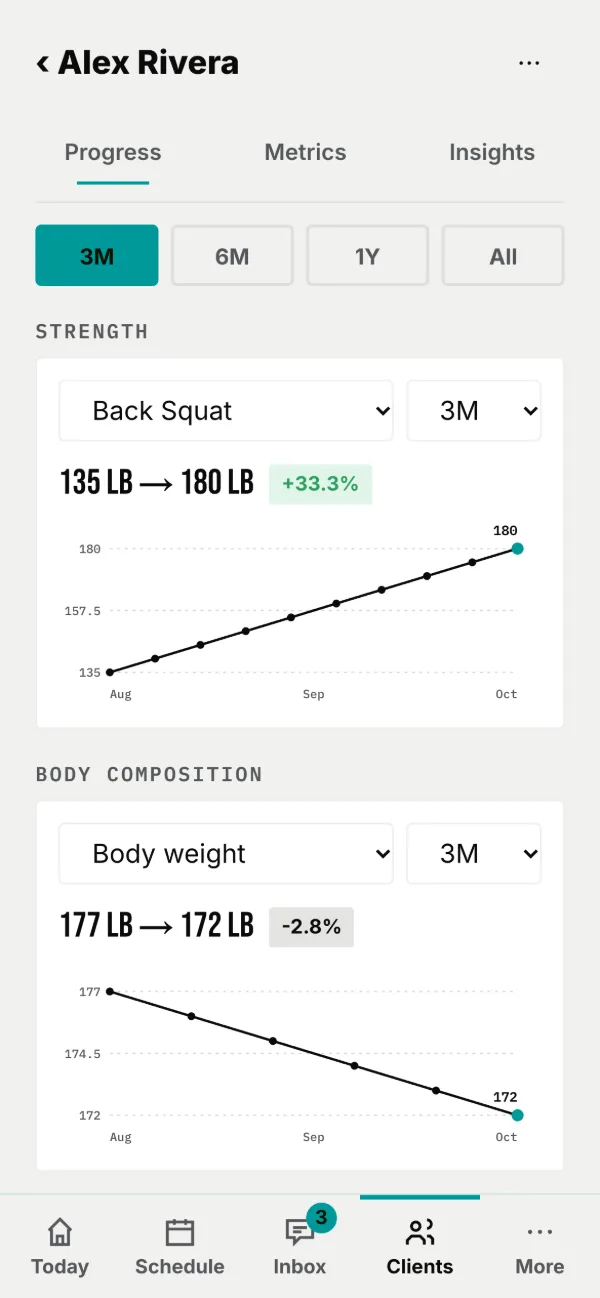
Progress & history
- Totals: Workouts, Day Streak, Total Volume, Total Load.
- Measurement history: dated entries with body weight and sites, plus "changes over time" deltas.
- Personal records: grouped by exercise, each with the weight and date.
Switch to History for the full activity timeline: every workout, message, PT session, check-in, measurement, and exercise swap, newest first and expandable. You can delete a workout or session from here (with a confirm).
Running a gym
If you own a gym, More → Gym admin opens your gym console. Use it to manage coaches, set the gym-wide brand, and move clients between trainers. (You also coach your own clients, and everything in this guide still applies.)
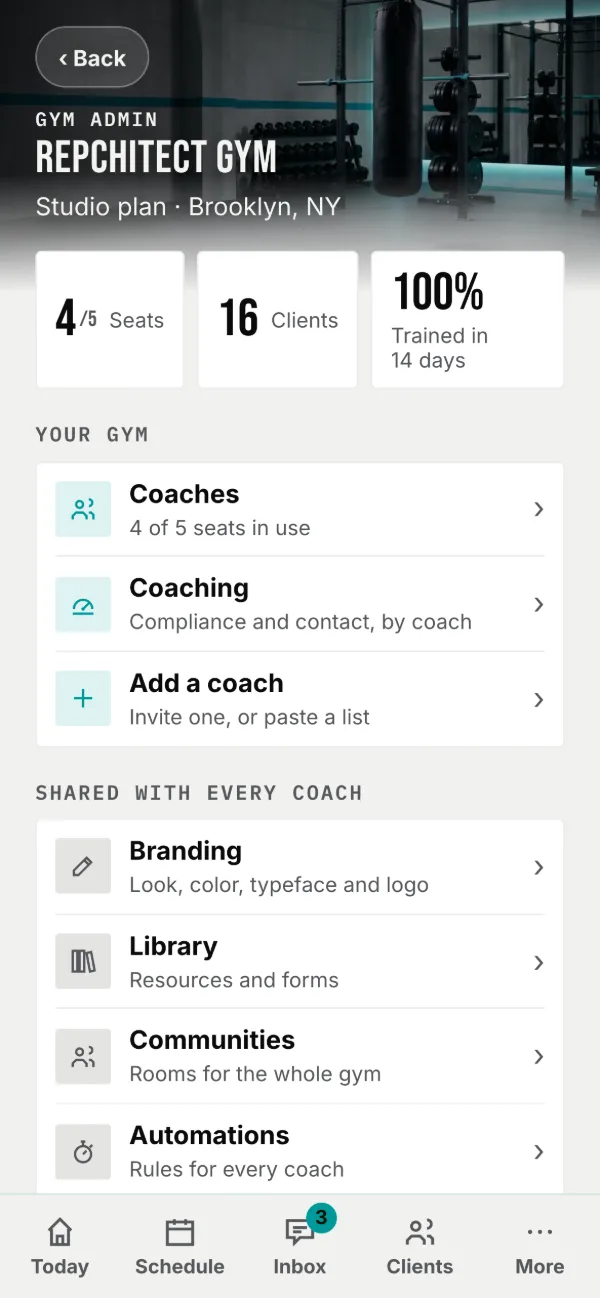
Three tiles up top: Seats, Clients, and Trained in 14 days. The console shows your coaches and counts only, never individual clients' health data.
Manage your trainers
- Open Add a coach, enter a name and email (one seat each) and tap Send invite, or paste "name, email" lines under Add several and tap Add all.
- Have each coach sign in once with that email. Their login links automatically.
- Tap any coach's row: Pause stops them signing in (data kept) and Unpause restores it. You can't pause yourself.
Gym branding
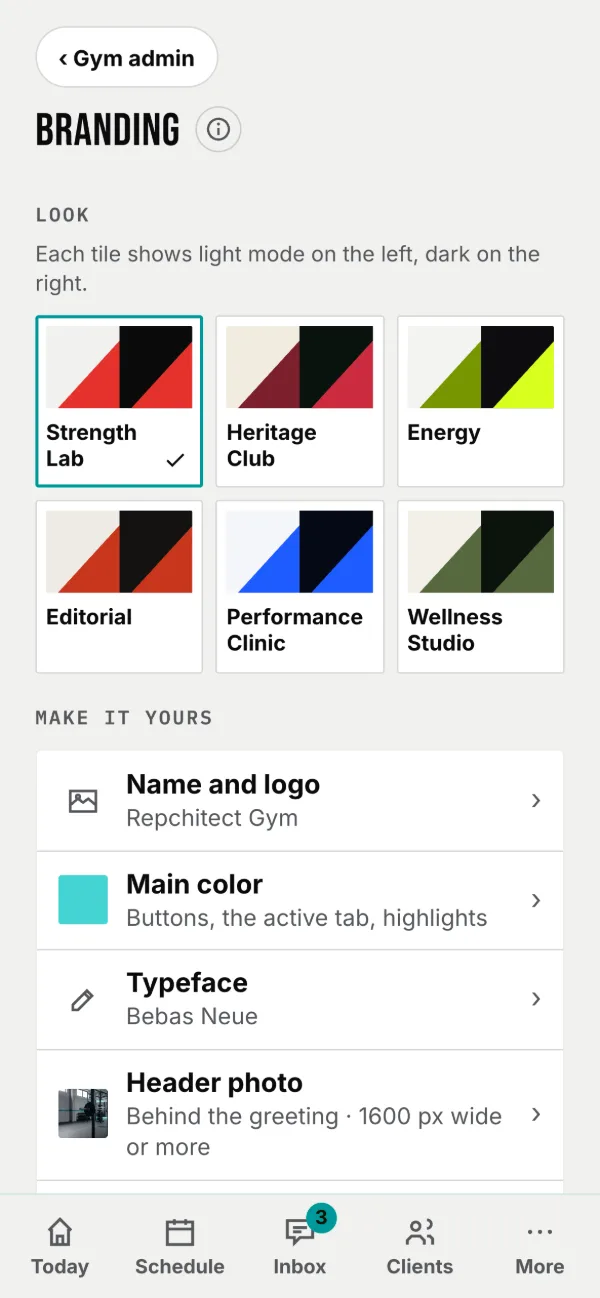
Your gym's look overrides each trainer's individual brand, so every client sees one consistent identity even if their coach changes.
- Open Branding in the console. It is the same page as your own Appearance & branding.
- Pick the gym's look, then its name and logo, main color, typeface, header photo and corners. Each page has its own Save.
- Turn on Let coaches use their own branding if your gym licenses seats to independent coaches; each coach's clients then see their coach's look.
Reassign a client to another coach
- In Coaches, tap the coach's row, then Reassign a client.
- Pick the destination coach (an active trainer in your gym).
- Every client starts ticked; untick any to leave them, then tap Move N clients and confirm. Clients keep their portal and full history. Only the coach changes.
Moving from another app
Coming from Trainerize, TrueCoach, Everfit or My PT Hub? Here is the honest version of what moves, what doesn't, and the order that makes it painless.
What each platform lets you take
Checked against each platform's own published help centre. Their articles change, so if a step below no longer matches what you see, their help centre is the authority and we would like to know.
| Platform | Client list | Programs | Client history |
|---|---|---|---|
| Trainerize | CSV export | PDF or print only | Cannot be exported |
| TrueCoach | CSV, emailed to you | Text file, per client | Not as data |
| Everfit | Not documented | PDF only | Not documented |
| My PT Hub | Not documented | Not documented | Not documented |
The order to do it in
Do not cut over cold. Keep the old account live throughout and move people in batches, so the first few teach you anything you need to know.
- Export your client list while you still have the account, then bring it in with Import on Clients (below). Even where only names and emails come out, that is the list you will work from.
- Save your live programs as PDFs. Every platform here can print or export to PDF. Only save the ones you actually use.
- Set up your branding. A look, your color, logo and header photo. Ten minutes, and the first link you send already looks like you. See Appearance & branding.
- Rebuild your templates. Open a PDF beside the builder and work through it. Five templates is a normal afternoon.
- Add one pilot client. Someone easygoing who trains often. Send their link and watch them log one session.
- Note each client's current numbers as you add them. Working weights and any PRs worth keeping. This is the five minutes per client that makes the history question stop mattering.
- Move everyone else in batches of five, with the message below.
- Publish your availability so clients book themselves. Most trainers do this last and wish they had done it first.
- Leave the old account live for 30 days, then cancel. Check their notice period early, because annual plans vary.
Import your client list
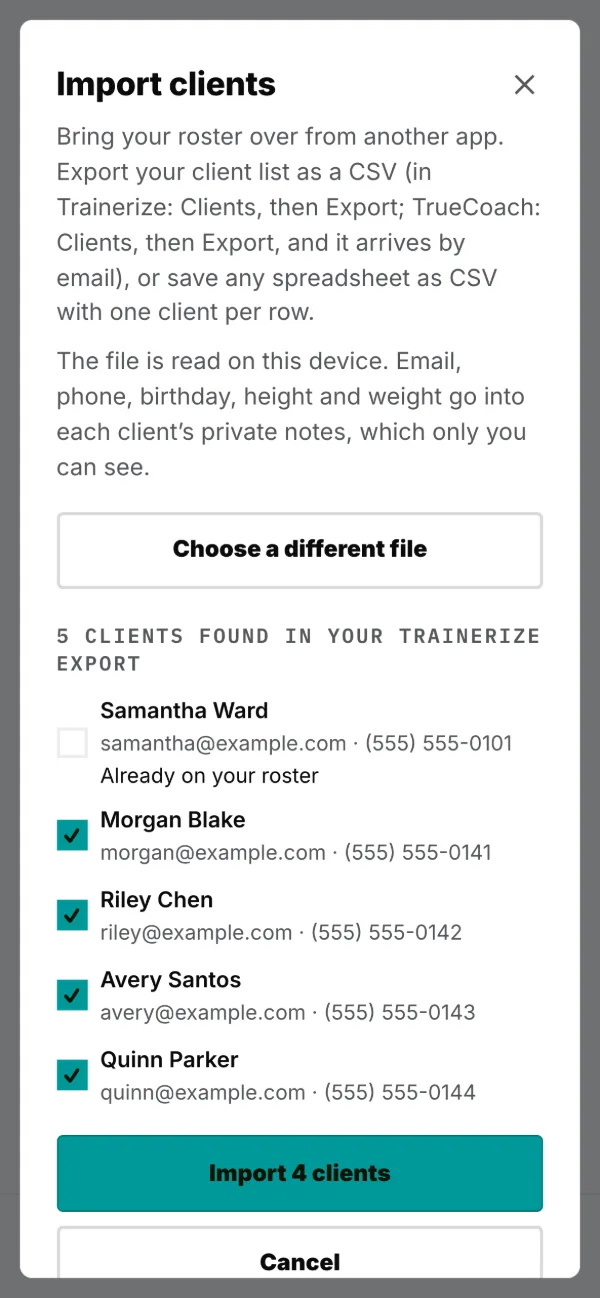
- On Clients, tap Import and choose your CSV. A Trainerize or TrueCoach export works as it comes; any spreadsheet saved as CSV works too, one client per row with a name column.
- Check the list. Anyone already on your roster arrives unticked, so importing the same file twice does not make duplicates.
- Tap Import. Email, phone, birthday, height and weight go into each client's private notes, which only you can see.
- Copy each person's link and send it to them. Nobody is emailed automatically, and the link is their sign-in, so send it only to them.
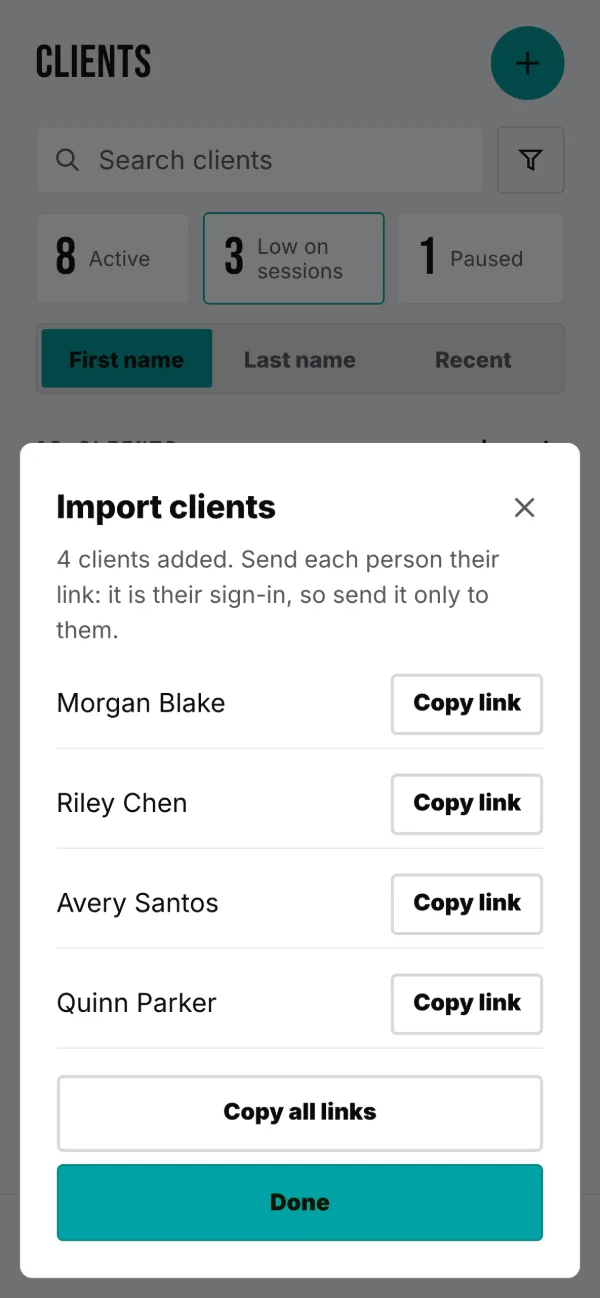
When the import finishes you get every new client's link in one place, with Copy all links if you would rather paste them into your own notes first.
Telling your clients
This is the actual job. Moving programs is an afternoon; moving thirty people is the part that needs care. On every platform you are leaving, your clients have an account, a password and an installed app. On Repchitect they have none of those, and that is the thing to lead with.
Something like this works. Adapt it, but keep the reassurance in the first two lines, because people do not read past their first worry.
- "I am moving our training to a new app this week. There is nothing for you to download and no account to set up."
- "I will send you a link. Tap it and your program is there. Add it to your home screen and it works like a normal app, including offline at the gym."
- "Your old app stays live until [date] if you want to look back at anything. Screenshot anything you want kept and send it over."
- "Nothing about our sessions changes."
The three questions they will ask
- "Do I lose my history?" The old logs stay in the old app, which is why it stays live for a month. Their PRs carry over because you enter them, and everything from the switch onward is in one place.
- "Do I have to pay for anything?" No. And if they were paying for a client-side subscription anywhere, that stops.
- "What if I lose the link?" You send it again. It is not a password and it cannot expire by accident. You can also regenerate it from their profile if it ends up somewhere it should not be.
From Trainerize
Trainerize documents its export options clearly, which makes this the most predictable of the four.
Export your client list
- Log in to Trainerize on the web, not the app.
- Open the Clients tab in the left-hand menu.
- Select all clients, or just the ones you are moving.
- Click the Export icon to download the CSV.
You get first name, last name, email, phone number and trainer name. That is enough to create every client here: bring the file straight in with Import on Clients.
Save your programs
- Open a workout or program.
- Use the built-in Print option and choose Save as PDF.
- Repeat for the programs you actually use. Skip the archive.
Trainerize states that programs, workout templates and training phases cannot be transferred to another account, so treat these PDFs as your rebuilding reference rather than an import file.
What stays behind
Workout history, progress statistics, body measurements and program adherence. Trainerize holds these back for client privacy. Screenshot anything a client will miss before you close the account.
From TrueCoach
TrueCoach gives you more than the others. Take advantage of it before you cancel.
Export your client list
- Open your client list.
- Click Export. The CSV arrives by email rather than downloading straight away.
- To include archived clients, switch to the archived view and export again.
- For one group only, filter the list by that group first, then export.
The file is unusually detailed: names, email, phone, birthday, location, timezone, height, weight, unit preference, gender, client type and state, plus compliance score and total workouts completed.
Export your workouts
- Open the client's workout calendar.
- Click the Export icon at the top right.
- Choose the time frame and an email address, and add a message if you want one.
- A .txt file arrives by email shortly after.
For a program not currently assigned to anyone, TrueCoach's own suggestion is to assign it to a client, export from the calendar, then unassign it. Roundabout, but it is their documented method.
What stays behind
The exports are text and CSV, so you are still rebuilding rather than importing. Keep the compliance and workout-count figures as a snapshot of where each client stood on the day you moved.
From Everfit
Everfit documents PDF export for training content and form responses, plus a sales export. A client-list export is not documented, so plan to build that list by hand.
Save your programs
- Open a workout.
- Use the Export or Print option to save it as a PDF.
Clients can export workouts as PDFs from their own app too, which is occasionally useful for something you no longer have open.
Take your forms and your figures
- Form responses export individually as PDFs, from either side. If you use forms for intake, export the recent ones. They answer the same questions Repchitect asks a new client on their first visit.
- Sales data exports from the payments dashboard for a chosen period. Everfit notes the export needs redoing once a period passes, so pull your figures before you cancel rather than after.
Building your client list
With no documented CSV export, work from your client list on screen and type names and emails across. For most rosters that is twenty minutes. Filter or segment the list first so you work through it in a sensible order, and it is worth asking Everfit support whether an export exists before doing it the long way.
From My PT Hub
My PT Hub's help centre returns no export articles. That is not the same as no export existing, so the first step is to ask rather than assume.
Ask them first
Contact My PT Hub support and ask two questions plainly:
- Can I export my client list?
- Can I export or print my programs?
If the answer is yes, use it. If not, everything below still gets you across.
If nothing exports
- Work from your client list on screen and type names and emails into Repchitect. Twenty minutes for most rosters.
- Open each live program and print it from the browser. Browser print to PDF works even where an app has no export button.
- Screenshot anything client-specific that matters, particularly current working weights and any PRs.
- Rebuild as normal.
Help & troubleshooting
Where to get answers inside the app, how to report a problem, and quick fixes for the things trainers ask about most.
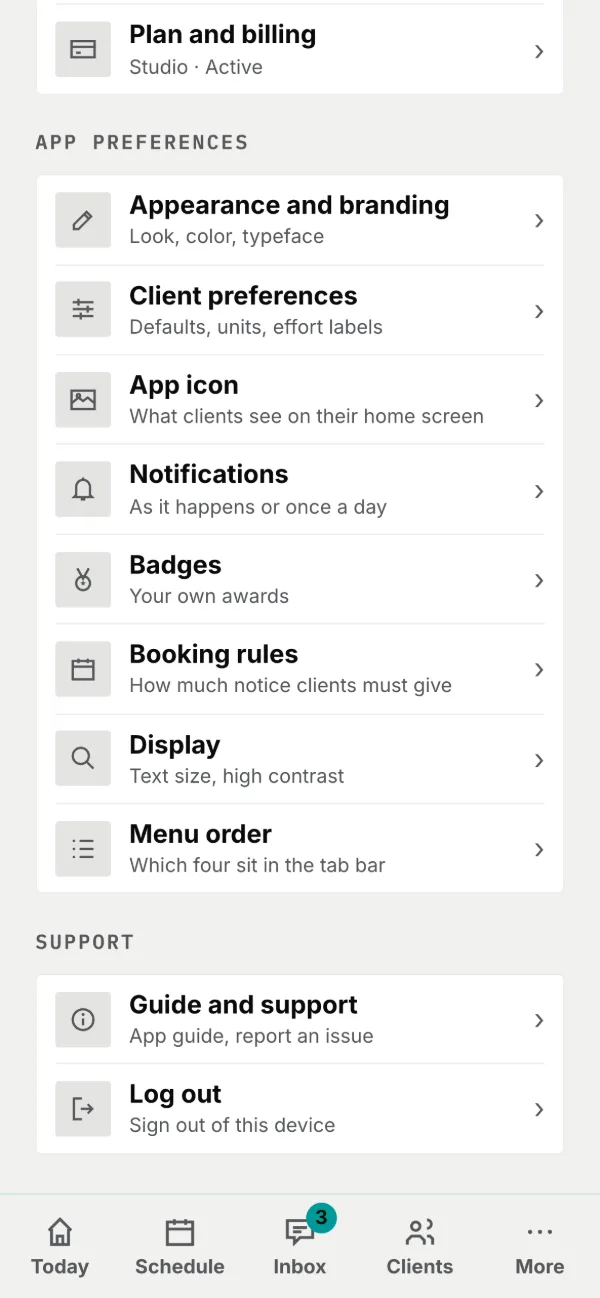
In-app help
- Open the guide: Settings → Guide and support → Trainer guide.
- Report an issue: Settings → Guide and support → Report an issue sends a bug or feedback note, with an optional screenshot or screen recording.
Common questions
A client's link doesn't work. If you recently regenerated it, the old one stopped working; resend the new one from Details → Access.
A new appointment isn't in my calendar. Subscribed calendars refresh on their own schedule; set it to every 15 min or re-add the subscription. Make sure you Subscribed, not Downloaded.
A client lost a session. Only a passed PT session or group class deducts one. If the count is wrong, correct it with Edit package in their Details.
A setting didn't stick. Each Settings section saves separately; tap that section's own Save button.